
A glove box is a piece of safety equipment that allows you to work on an object in an enclosed place. Such work might need to be isolated and to keep an eye on what you're doing it is good to have a glove box to hold the gloves and the object you're working on.
Glove box provides protection to the operator working on the object and as well protects some sensitive object or work away from the outside world. The glove box has lots of applications and also different types of isolation projects require a different box. Check out our compiled list of DIY glove box projects.
Table of Contents
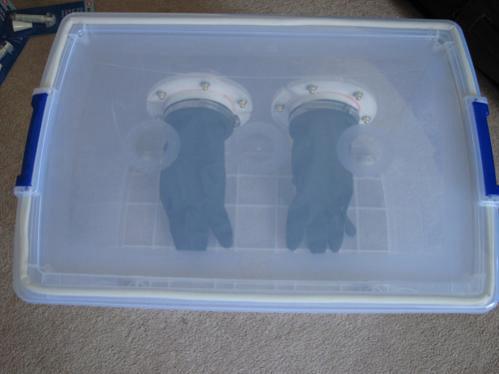
1. How To Make A DIY Glove Box
A glove box is very easy to build and it can be made with plastic, cardboard or any other materials you find. This glove box is made from a plastic container. The process is simple; get the plastic box, make two holes by its side. Fit the gloves through the holes. Make a smaller hole on the opposite side for the work pipe.
2. Simple DIY Glove Box
Here is another plastic glove box. It is very simple and requires basic materials such as clamps, a glue gun, gloves, pipes, a knife, and a plastic storage box. Watch the tutorial above to learn more about the plastic glove box.
3. Glove Box DIY
The materials needed for this glove box include a clear plastic storage box, some short pipes, gloves, clamps, plastic epoxy, drill, and foam. The instructor used a clear plastic box because he needs to see through and the epoxy was used to fix the glove to the plastic.
4. Super Easy DIY Glove Box
For this super easy glove box you only need a plastic storage box and two short pipes. Cut two holes on one side of the box and fit the pipes through each of the holes. It is as simple as this.
5. Cheap DIY Glove Box Tutorial
This glove box is made from a transparent plastic container that has a cover.
The first thing to do is to get the plastic container and other materials required. Some of the materials include PVC toilet flanges, metal hose clamps, long cuff rubber gloves, door gap weatherstripping, clear silicone tube, Exacto knife, nuts n bolts, and washers.
Trace the opening of the flange on the side of the plastic container to make two circles. Cut through the circle to get a hole bigger enough for the flanges. Then screw the flanges into the holes and hold them with silicone.
Attach waterproofing to the top of the container. Stretch the gloves around the holes and hold them tightly with metal clamps.
The total cost of this project is $70.
6. Homebrew Glove Box
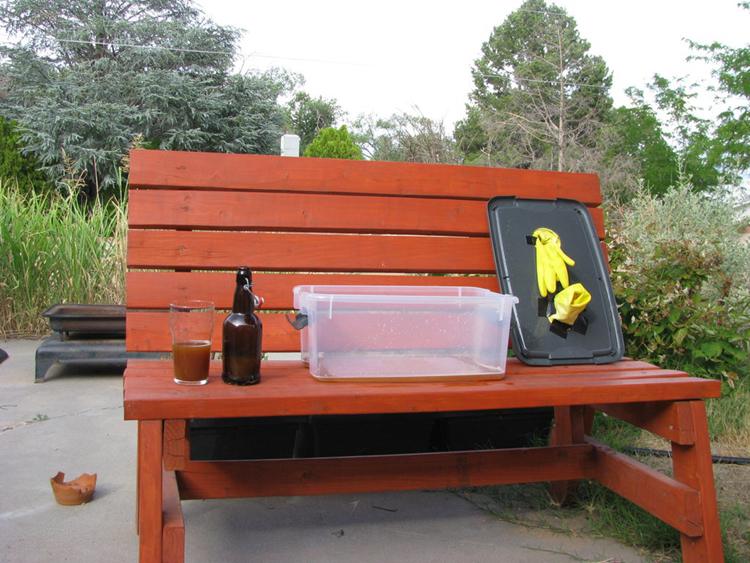
This glove box can be used to store your homebrewed beer. It is not good to waste your energy on a beer and when you set out to enjoy your brewed beer, it all escapes from the bottle and flows all over the floor. To trap your over pressured beer, a homebrew glove box can help you collect the beer.
To make this glove box, you need to get a plastic container with a cover, a power drill, and a bath caulk.
Drill pilot holes on the cover of the container using the power drill. Make the glove holes wide enough for your hand to stick through.
Attach the glove through the holes and hold them with duct tape. After attaching the gloves, you can set your beer into the container.
7. Low-Cost Research Glove Box
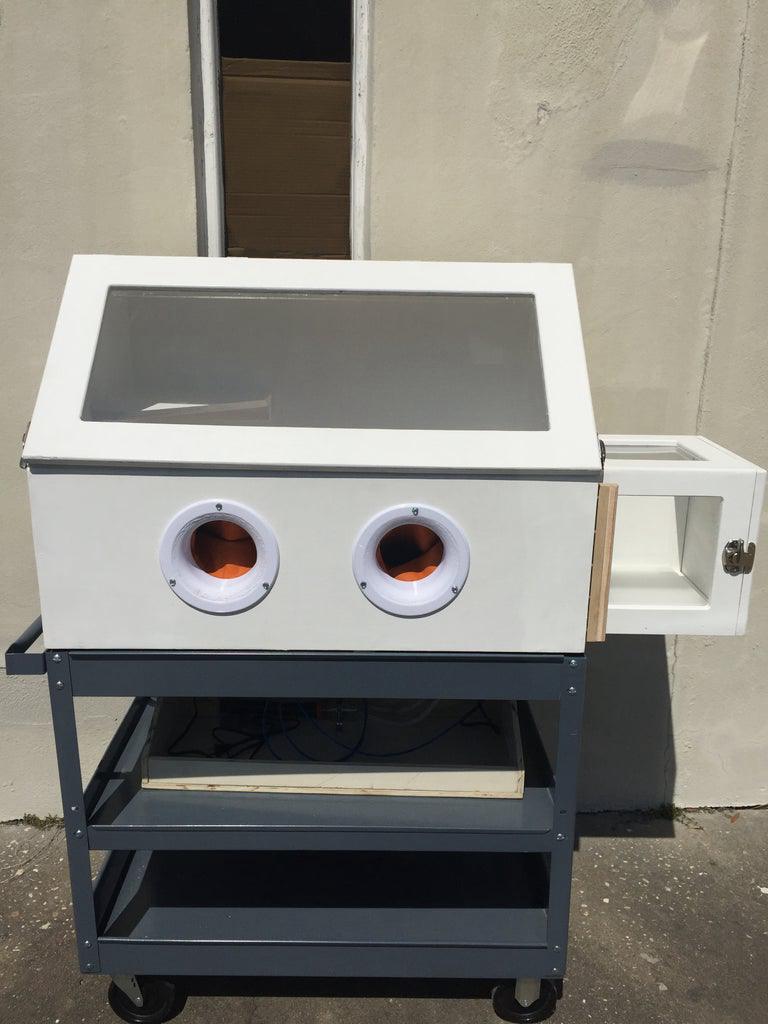
Making this amazing glove box is not as cheap as its title suggests but it is very exceptional and huge. Maybe that's why the cost is a little bit high.
Tools
You need a long list of materials and tools to make it come to life and the materials include: Table saw Jigsaw, router, circular saw, power drill, straight edge, tape measure, hole saw, paintbrush, paint roller, and foam sleeves, 220 grit sandpaper, cabinet grade birch plywood, acrylic sheet, deck screws, gorilla glue silicone sealant, gorilla glue epoxy, PLA for 3D printed parts, 1.75” die-cast sliding window sash lift, gatehouse door hardware,1-pint mason jars
Materials
Valspar Duramax satin latex exterior paint, white, silicone caulking, Arduino microcontroller, breadboard, 5 different colors of wiring, 9-volt battery, adafruit DHT22, 10kΩ resistor, stepper motor (28BYJ-48), Two relays (JQC-3FF-S-Z), CAT 5 wiring, 90-degree elbow (copper), plastic hosing, hose clamp, extruded Aluminum panel, scrap plywood, LED strip lights to DC converter, hose clamps
8. DIY Anaerobic Chamber
The materials needed for this DIY anaerobic chamber include a big plastic box, relief valve, gas intake, double hatch system, C clamps, pressure gauge, insulation foam, silicone, duct tape, and rubber arms. The first thing you need to do is to prepare the footers. This will raise the chamber a little from the surface of the table. Then you need to close the lid using some C clamps and insulation foam.
9. How To Make A Simple Glove Box
In this video tutorial, you will learn how to make a simple glove box using some basic materials. The project doesn't require much of your time, your energy, and money. All you need to do is follow the instructions given by the instructor and you're good to go.
10. How To Make A Clean Air Enclosure
Some sensitive work such as hard drive data recovery must be carried out in an air-enclosed space. A glove box is a good example of such space. To make this you don't need lots of materials and this is why it is very cheap. The total cost is around 10 pounds and can be completed in 3 hours.
11. Homemade Glove Box
Homemade glove boxes are amazing, you can do it anytime or anyhow you want. For this box, you need a medium size multipurpose storage box with a lid. Make two holes on one side of the box. Fix two small pipes to each of the holes and attach the gloves. Hold the gloves in place with glue and clamps.
12. DIY Glove Box Build
This glovebox requires some power tools but that doesn't make it expensive. The power tools make the project easier and faster. Just with s other glove boxes, you need large multipurpose storage, metal clamps, and PVC pipes.
13. DIY Astronaut Glove Box For Kids
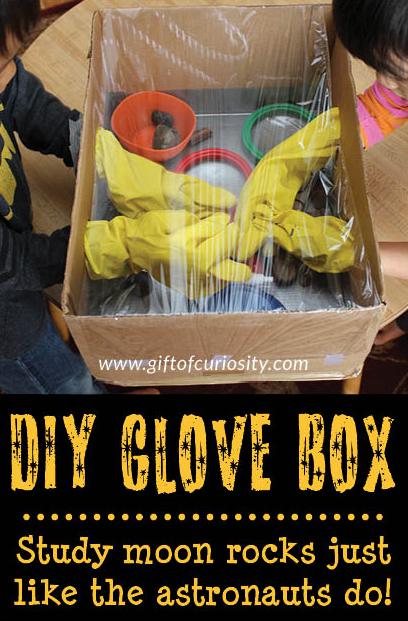
This astronaut glove box is made from a large cardboard box. Here is how to go about it;
Get a large cardboard box, cut off the lid flaps. Line the bottom of the box with duct tape. Then, make two holes on either side of the box. Make sure the hoke is big enough for the hands that will go through it. Get the gloves and put them into the box through the hole. Then, tape the opening of the gloves to the side of the cardboard box from outside.
14. Dust Catching Glove Box DIY
A large plastic storage box with a lid will be amazing for this glove box. Open the box and mark where your arm will be. Cut a hole through the marked area. Do the same for the other side. Make sure the holes are big enough to contain your hand. Now, it's time to fix the glove. Use duct tape to attach the glove to the hole. After this, the next thing you need to do is to make the cord hole.
15. How To Make A Glove Box For Seed Propagation
To make this glove box, you need two multipurpose storage boxes, 4 screws, a glue gun, a marker, an old CD cutter, and a LED light. Mark and cut two holes on the side of one multipurpose storage box. Place the other box on top of it face down.
Hold them together with screws, one on the left, right, front and back. If the screw is not holding them closely, you can seal the edges round with glue. Then, attach the LED light on top of the top box to make planting easier and clear.
16. DIY Glove Box For Kids
This is another glove box made from a cardboard box. It is very simple and cheap. All you need to do is to cut off the flaps from the box and make two holes by its side. Fix the gloves through the jokes and cover the box with a clear plastic bag.
17. Glove Box Made Out Of Ice Cream Box
Glove box made from a small ice cream box! This is amazing. Here is how to recycle an ice cream box into a beautiful glove box; Get a small Ice cream box, remove the lid and wrap pieces of fabric around the box. Use hot glue to fix the fabric tightly. Attach some trimmings, and flowers to the box to decorate it.
After this, cut a kite-shaped hole in the middle of the lid, polish the edges of the hole so that it won't damage the gloves.
Cover the front of the lid with the same fabric as the box and add trimmings to it as well. Fold the gloves carefully and place them inside the box. Return the lid and you're good to go.
Conclusion
We have come to the end of this article on DIY glove box ideas. As you can see, if you want to get yourself a DIY glove box, then that’s something really easy for you. All it takes is some time and you will be able to build one of your own at home. I hope this DIY Glove Box article was helpful in some way.

Ask Me Anything