
I'm a fan of projects that save you money. I don't know about you, but every penny counts around here. I’ve seen many times people asking about spreader bars on forums, or even people asking questions on Quora about how to make them. Even two years ago, I was wondering how to make them, but there were no tutorials available at the time. Fast forward to today, there are a couple of amazing tutorials online that show you how to build a DIY spreader bar.
In this article, you will find a compiled list of amazing DIY spreader bar projects, all you have to do is go through the list, pick one that you like, and start the making process which usually begins with gathering a couple of materials and tools. If you are a beginner in craftsmanship, you might want to go through a particular tutorial more than once to get the hang of the making process.
Table of Contents
1. DIY Spreader Bar
You can make a spreader bar from an adjustable bar and aluminum pipe. The reason why you need the aluminum pipe is to elongate the short adjustable bar. Cut the aluminum pipe and drill one hole that cut across both sides of it. Then, screw me the adjustable bar to the hole. Sorry pain them and allow them to dry. Once they are dried, you have your spreader bar ready for use. Imgur
2. How To Make A Spreader Bar

When making a hammock or a fabric bed, a spreader bar is necessary to put the bed together. It would help if you had cedarwood (oak will work perfectly too), drill, sandpaper, and exterior spray-on finish for this spreader bar. Cut the center to the desired length and sand it down. Drill 22 holes on the cedar pieces. Make sure the holes are lined on one side of the pieces. After this, use the exterior finish, coat the cedar pieces, coat the inside of the hole. diy.dunnlumber
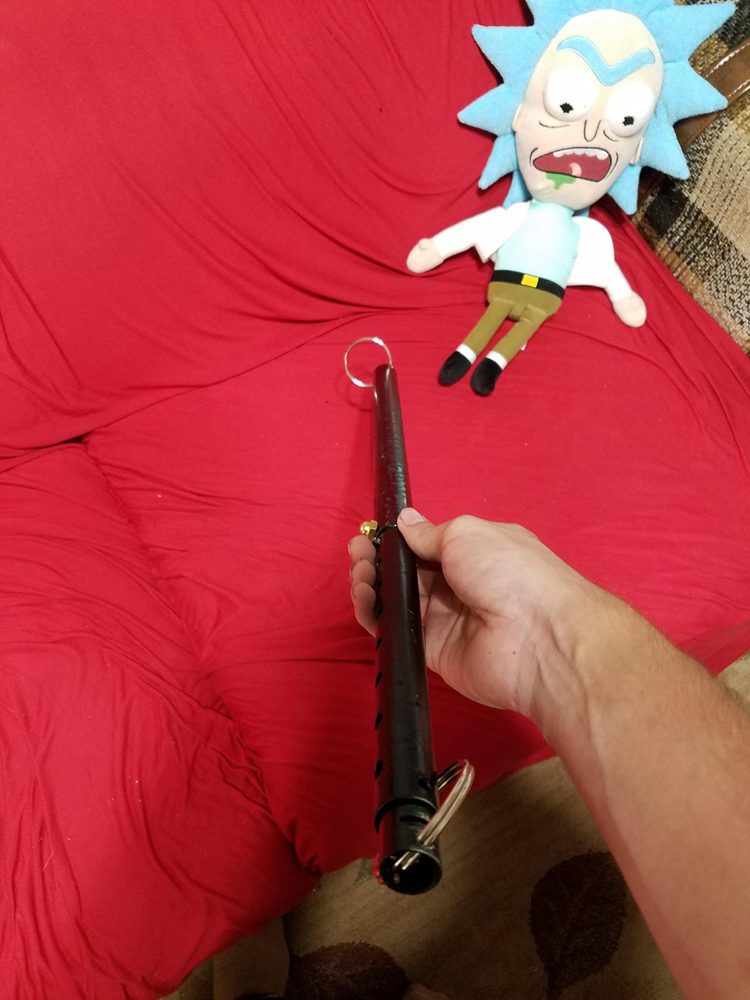
3. Homemade Bondage Spreader Bar
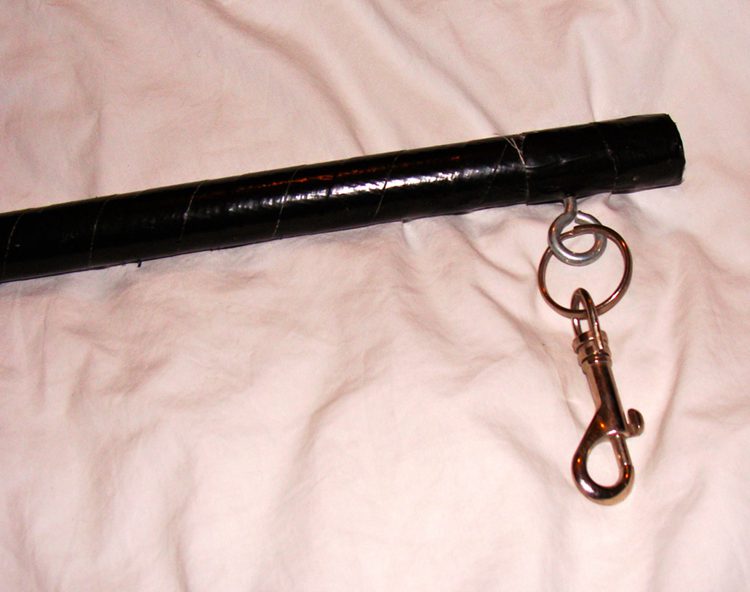
The materials needed for this homemade bondage spreader bar include eyes screws, broom/mop handle, 2cm diameter length of dowel, gaffer/duct tape, carabiner, or padlocks. After gathering these materials, the next thing to do is to put them together.
Cut the broom handle to your preferred length and sand all the rough edges. Cut two pieces of tape and use it to cover both ends of the broom handle—drill holes on the handle for the eyes screws. Once the bar is ready, use the gaffer/duct tape to cover it with a black finish. kinkytesters
4. DIY Spreader Bar
A spreader bar doesn't have to belong to do what you want it to do. It is made from a dowel rod and some hardware. However, it requires some power tools, like a power drill, Dremel, saw, and large screwdriver. For the finish, you need spray paint and sandpaper to give it a nice finish (tack cloth will also work in place of sandpaper).
Measure and mark the dowel rod piece using a pencil and a straight edge. Then, cut it with a saw. After cutting, sand down the piece and start drilling pilot holes on it. After preparing the holes and it's time to add spray paint to it. Spray the bar and use sandpaper or tack cloth to run it to give it a nice look.
5. How To Make A Spreader Bar
You need three main components for this spreader bar: an aluminum pipe, eyebolts, and a drop-in anchor. Once you have these three materials, you're good to go. You can get any length of line you want.
You don't need any tools for the project because you can assemble most parts of the spreader bar with your hands. The eyebolt is not the one that needs to be screwed on. All you need to do is thread it to the drop-in anchor. After threading the eyebolt to the anchor, but the anchor into the opening of the aluminum pipe.
6. How To Make A Squid Spreader Bar
The materials needed for this squid spreader bar include parks of squid, packs of birds, ruler, permanent marker, scissors, steel bar, swivel, stainless steel thimbles, beads, hook, and shackles.
After gathering all these materials, the next thing is to cut off some inches from each squid and fit the bird to it. After this, you can start attaching all other components to it. It is a straightforward procedure.
7. DIY Spreader Bar
All you need for this spreader bar is a piece of 2×4 and a set of anchor points. Since you need only one piece of wood, there are many ways you can get the wood with or with money. If you have scrap wood at home, you can buy culled wood pieces from the lumber department in the store or ask for a piece from a construction site. Once you have the wood and the anchor, all that remains is to screw on the anchor to the wood and have your spreader bar.
8. Bamboo Spreader Bar Tutorial
Christian Red did a great job explaining how to tie a bamboo spreader bar in this video. He used a long piece of bamboo stick and two ropes. The basic technique of tying is to connect two things in opposite directions. He explained the types of knots required. Check the link below for full detail of the video.
9. How To Build A Spreader Bar
For a spreader bar, the essential component is the wooden stick for the bar and the hardware on it. The process is to install the hardware perfectly to the wooden post. Get both materials, cut the wooden stick to your desired length, and sand it properly. After that, drill holes on it and screw the hardware into the holes. The most common hardware used is eye screws.
10. How To Make A Spreader Bar
Learn how to make a spreader bar in less than 15 minutes using some basic materials and tools you have around. The materials and tools used include drill, drill bits, fickle plastic, Exacto knife, set of blades, glue, sandpaper, and something for the lifting lodge. Round the edge of the lifting edge with sandpaper and cut it into pieces (make sure the edge of each piece is rounded). After that, make holes in the fickle plastic and attach a lifting lodge to it with glue.
Conclusion
Spreader bars are straightforward to make once you have the materials, tools, and a guide to instruct you on the primary process. Thanks for stopping by, feel free to comment below if you have any questions or contributions regarding this article.

Ask Me Anything