
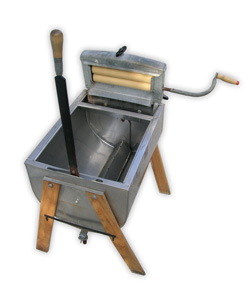
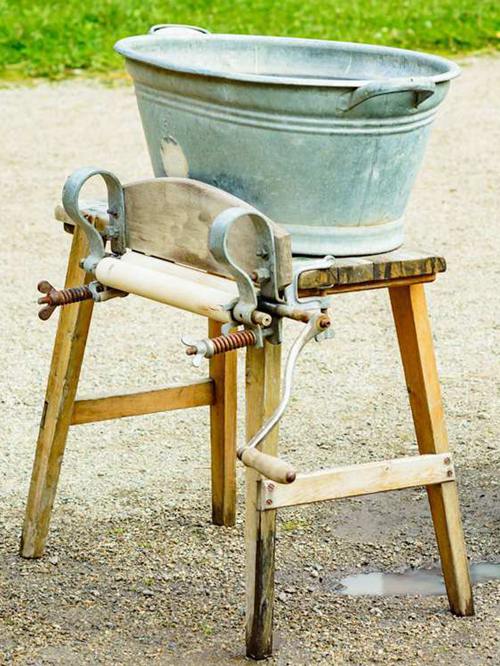
For nearly ten years I used the James Handwasher (purchased at Lehman's Hardware in Kidron, Ohio) pictured to the right to wash the clothes in our household of two people. Around five years ago, we purchased an automatic washer/dryer stackable unit. I continued to use the hand-cranked method on an occasional basis, but the time between occasions grew longer and longer. On reflection, I concluded that for me the main psychological barrier to using the hand-cranked method was the wringing. Any number of unpleasantries are attached to the wringing task. Each piece of wet laundry must be individually handled as it's fed through the wringer. Ordinary items like shirts require vigilance to avoid jamming, and certain items, like jeans or garments featuring cord-locks are virtually impossible to feed through. At the very least, such items require a wrestling match with wet laundry. Plus, wringing (at least in my experience) offers an inferior result when compared to the spin cycle of an automatic washer: even a wringer in the hands of an experienced hand-cranked washer still results in laundry that will drip when hung on a rack.
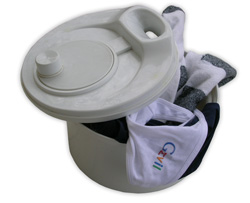
Rather than wring my hands, I reflected on the possibilities offered by an ordinary hand-powered kitchen tool: the salad spinner. Perhaps there exist gigantic salad spinners designed for use in commercial kitchens, but I could not find a source for such devices, and the standard household model is clearly not adequate for the job of spinning a small collection of underwear and socks
Examining the construction of the salad spinner, I realized I needed a giant perforated metal tub that I could spin inside a solid tub so that the water forced out of the laundry through centripetal force would collect on the inner wall of the solid tub, then drain out the bottom, instead of flying all around the room. Drying lettuce in the salad spinner over the years, I'd seen minor lettuce-load imbalances wreak havoc with the spinning action. So I figured I would need a way to build some amount of play and shock absorption in the whole system.
Of course, the engineers at General Electric, Maytag, or really any manufacturer of automatic washers, have already invented this wheel. So my strategy was to adapt a broken washing machine to my specific purpose of spinning clothes.
Overview (the big picture) In the photo below of the complete system, three basic elements are apparent: the modified washer, the modified bicycle trainer, and the rigid interface between the bicycle trainer.
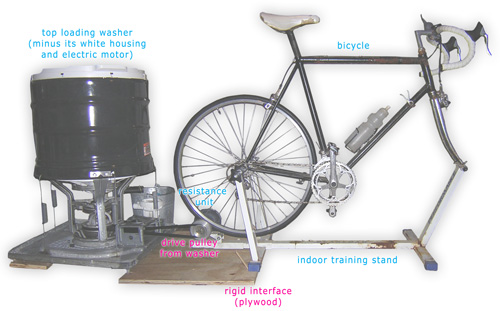
Table of Contents
1. Modifying the Washer
Unbolting Stuff
- Remove the white metal shell from the washing machine.
- Remove the electric motor from the washing machine frame.
- Remove the pulley from the motor shaft.
- Detach the drain hose that leads from the tub to the pump.
- Remove 'brakes'.
- Save the belt from the pulley.
Discussion
- Notes (Remove the white metal shell from the washing machine): Just unscrew every nut/screw you can find. Most of them are pretty accessible. Be prepared to cut some electrical wires. What you want is the part you see pictured above. Or something like it.
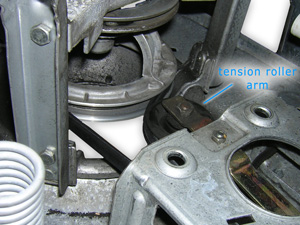
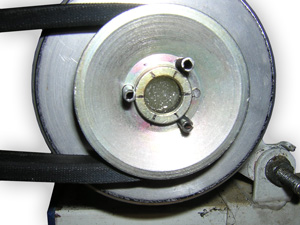
- Notes (Remove the electric motor from the washing machine frame): This will require navigating a wrench into very tight spaces. It pays to have a very small socket driver. When you're tearing out the motor, preserve the tension roller arm [cf. picture below]. This is important for keeping the drive belt on the pulley under high rpms.

- Notes (Remove the pulley from the motor shaft) The motor I dealt with was attached to the shaft with a tension pin. I knocked it out with a nail set. There may be two pulleys on the same motor shaft, one driving the washer and one driving the pump. The one you want is the one driving the washer.
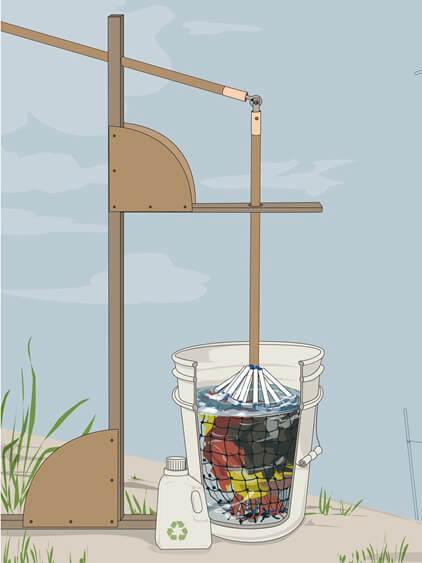
- Notes (Detach the drain hose that leads from the tub to the pump) The automatic washer is set up to feed the draining water to a pump, which is then typically pumped up into one of those large laundry sinks. You're not going to be pumping anything, so you want the water to run straight out of the tub into the bucket you will eventually set up, something like this:

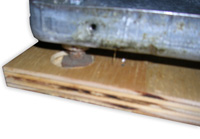
- Notes (Remove 'brakes'): Mounted under the tub, there may be little wedges designed to 'brake' the tub in the event things get out of control. Get rid of these and anything else that obviously interferes with the free rotation of the tub. The washer I modified had little brake pads housed as indicated in the photo:


2. Modifying the Trainer
Drilling Stuff
- Get some tension pins.
- Get a drill bit to match.
- Drill three evenly spaced holes through the pulley.
- Position the drilled pulley onto the flywheel so that it's perfectly centered.
- Drill through the flyweel.
- Hammer in the tension pins
Discussion:
(1-6) Notes: Take the pulley you're going to drill to your local hardware store (in Ann Arbor, my choice is always Stadium Hardware) and say something like: "I'm going to drill through this three times and I need to put tension pins in there." You will leave with a drill bit and three matching tension pins. Buy four pins if you plan to drop one where you can't find it. There's probably some quick and dirty way to lay out three evenly spaced holes on the pulley using some trick from middle-school geometry that I don't know. I used Photoshop and printed it out. The pulley might have a flat side and a curved side. Because the flywheel to the bike trainer resistance unit is likely flat, use the rule: flat goes against flat. CRUCIAL: the holes can't go through the 'flangey' part of the pulley ... that'd put pins in the way of the belt. As you can see from the detail shot below, you might break off a drill bit, if you're not careful (look at the right side). It's important that these holes be 'straight', that is to say at a 90 degrees angle to the surface of the pulley. I used a drill guide attachment to my hand-drill for this. A drill press would be better. Probably the best strategy is to drill the holes through the pulley first, then go for the holes through the flyheel, using the pulley as a template.
How do you position the pulley on the flywheel so that it's perfectly centered? Long story short, I eyeballed it. I helped myself out by spinning the flywheel and using a Sharpie permanent marker to scribe several concentric circles onto the flywheel for additional visual reference points. I also gently rotated the flywheel (after turning the flywheel on its side) with the pulley resting where I thought it looked centered, and evaluated if it seemed centered under slow rotation. I epoxied the pulley in place, so that I didn't have to worry about slippage during drilling of the flyweel.
3. Preparing the Interface
Positioning Stuff
- Position the bicycle training-stand and the washer in a configuration you estimate will work.
- Take a piece of string as an ersatz belt to get an estimate of how long your belt will need to be.
- Take the old belt and your measurement (or just the string) to your hardware store and ask for one just like it but longer.
- Place the two back feet on predrilled plywood pads.
- Drill spaces for the washer feet and place big plywood under the washer.
- Install the belt with the training stand resting on the big plywood.
- Test out the configuration a bit.
- Drill holes for the training stand feet.
Discussion (1-8):
The belt drive requires a fixed distance between the two pulleys. The idea here is to engineer a plywood base to keep the bicycle training stand and the washer at a fixed distance. The washer feet furthest away from the training stand need not be a part of the rigid mechanism, but they need to be padded so that the washer isn't off balance. The rotation of an automatic washer's spin cycle is, as best I can tell, directional. Figure out which direction it's supposed to go. Put the twist in the belt (necessary to convert vertical spin into horizontal spin) accordingly.
The downside of this project
I initially used this configuration for about 10 loads of laundry over the course of two weeks (that's 30 spin cycles, as I spin the clothes out between each of two rinses in the hand-cranked washer). I was quite enthusiastic about the results and I still am. I imagine I'll keep doing the majority of our household laundry with this method long into the future. Before embarking on a similar DIY project, I advise others to consider:
(1) It takes above-average strength and conditioning to pedal the original configuration of gears I set up. Over the course of about a minute, I was able to accelerate to 50 rpms, and then sustain it for 3-4 minutes. The bicycle gearing was roughly 2:1. The ratio of the circumference of the roller contacted by the bicycle tire to the tire itself is roughly 1:25. The ratio of the drive pulley's circumference to the working pulley is around 1:4. So the rough aritmetic for the laundry tub is (50 x 2 x 25) / 4 = 625 rpms. I don't know what the original rating for this particular model was (I don't know what model is was, for one thing), but when I called GE's customer service phone line, the representative looked up a few different motor ratings for me (and by the way, that customer service rep really impressed) and from that I concluded that the range of spin-cycle rpms is something like 450-650 rpms. So this configuration spins on the high side of average. Ideally, you'd want to be spinning the pedals closer to 90 rpms, so that it's an aerobic effort, stressing the joints less, etc. With the gearing on the original configuration, spinning the tub at a normal spin cycle speed required slow grinding of the pedals. [Update: swapping the double-ring crankset with a triple ring sporting a very small inner ring, allowed a gear ratio of close to 1:1, resulting in a pedaling rpm of close to 90.]
(2) The rider of this configuration needs to try for a super-smooth pedal stroke. Violent accelerations within the pedal stroke lead to slippage between the bicycle tire and the resistance roller. Cycling shoes that clip to the pedals (you pull up as well as push down) help to smooth this out. Still, extra concentration is required.
(3) The resistance unit itself, even on its lowest setting (if it's a magnetic unit) will sap energy from your pedaling that could go into spinning laundry. At least the resistance on a magnetic unit (which mine was) is typically adjustable. A fluid-resistance unit would typically offer no such adjustment. [Update: I completely removed the magnetic resistance unit and replaced it with an additional drive pulley to power an electric generator.]
(4) The resistance unit will pretty much be ruined for regular indoor bicycle training even if you leave it in place. This comes from the fact that the pulley mounted to the flywheel is likely going to be off-center enough that under the higher rpms typical of an indoor training session, it will cause the unit to emit an unholy noise. Mine did, anyway.
The upside of this project
- Gray water recycle-ability: I empty that bucket from the spun laundry into a toilet tank.
- Zero electricity for entire laundry load if you dry on a rack.
- Drying puts moisture into the indoor air (good in winter).
- Exertion on the cycle is a good workout.
- Exertion on the cycle throws off heat into the indoor environment (good in winter, not great in summer.)
Bear in mind for future adaptation of indoor training resistance units:
- Precise centering of pulley.
- Elimination of resistance unit resistance.
- Use bicycle with a granny gear to increase pedaling rpms.
Ideas:
- Manufacturers of resistance trainers: build V-belt groove into flyweel.
- Mount pulley on the bicycle wheel on the opposite side of the gear cluster.
- Pedal-powered laundrette in student dormitories.


Ask Me Anything