Window well covers are built to prevent basement flooding, building up of water, snow & debris. Buying a window cover for your oddly-shaped window well may seem too expensive and most of them from the commercial store don't last for long.
You may want to try out one yourself which will be more durable and long-lasting. We've got these simple DIY window well covers compiled for your perusal and exploration! Go through our compiled list and make a pick.
Table of Contents
1. How To Make A Durable Well Cover
This durable well cover is made of PVC pipe and flexible unbreakable polycarbonate you can find in the roofing section. You will be needing your pipe cutter and tin snips to cut your polycarbonate appropriately. Get a number 8 ¾inch lash screws of ½outer diameter.
The polycarbonate should be 2/16 to 3/16 of an inch larger than the diameter of the screws to allow for expansion & contraction with temperature change. Clamp the polycarbonate to your PVC frame and drill holes on the side of the pipe to fit the screws, take off your polycarbonate and mount your frame on the window well placing the polycarbonate again and drilling your screws to fit in.
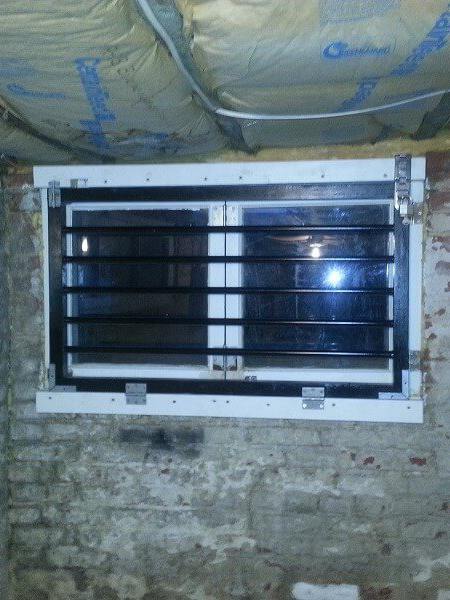
2. DIY Window Well Cover
This window well cover is cost-effective as well, get your ¾ stick, 10 foot stick EMT conduit electrical condo, T and L connectors, and a conduit Bender to get the curve around the window. Set up your frame with about two to three T-connectors placed vertically along your conduit, place your sun tough corrugated sheet with conduit connecting across T-connectors at the top and bottom to ensure that it's firm and not flimsy. Drill in your screws through the sheet to your conduit to fasten tightly.
3. How To Install A Window Well Cover

So, you have just finished building a window well cover but don’t know how to install it? Here’s a guide that will show you how to install a window well cover. The installation process starts with taking measurements of the window well and then following a total of 5 steps for the installation. It is pretty much easy to follow.
4. Window Well Cover Installation
You may have constructed and framed your cover but you're challenged with the installation. Well, you're almost done, this shouldn't be much of a problem. Here’s another guide that shows you another approach to window well cover installation. Ensure to drill holes first, Placing your frame on the erected platform, drill your screws to the wall so your cover looks like a lid you can decide to put a strap on your cover or you permanently tighten it up with your screw.
5. Window Well DIY
This happens to be the easiest step or method so far. You can have a rock bed around the window placing a glass shield at the top of the well then you put a nylon sheet over the glass and using any item that can anchor the nylon to the sheet and there you have it! This is by far one of the easiest DIY window well cover projects you can make from home.
6. DIY Custom Egress Window Cover
This custom egress window cover will require more time than the previous ones shared. This cover is made of wood. Ensure you have the right dimensions of your window well so you can set up your wooden frame. Screw top rail to side rail to form a square, then fix in two inner rails one at either end with two flat rails also.
Give your structure a smooth sanding finish so you move on to paint beautifully as you want it, you may have to paint extra wood which will be used for the finishing touch as the paint will take a day to dry up.
When your structure is dried place your screen on the frame and staple it to the wood then attach the final wood around your frame and drive in your screws for perfect finishing and your beautiful egress window cover is all done!
7. DIY Wooden Window Well Cover
You may have to show up your well-crafted carpentry skill here. This cover is made of hardwood which is designed and well crafted to fit the well. Get enough wood, you're not just going to make a frame to seal it up with a glass or screen, your wood will do the craft and design. Sanding shouldn't be left out and then paint beautifully.
8. DIY Egress Window Well Cover
This beautiful window cover is made of plywood, plexiglass, and lumber. With the right dimension of your well, shape your plywood to a frame, place your plexiglass on the frame, and cutting it to fit accordingly. You then drill holes on the plexiglass to the plywood, without screwing in yet lift up the plexiglass and apply glue on the frame then place your plexiglass on the glue and the drive-in your screws to fit in tightly. Use your lumber to set up an extension on the plywood so that when it is placed on the well there is an overlap. This is easy and beautiful and will save cost.
Conclusion
Building a window well cover is not as easy as it looks. Be sure to take measurements of the window well before going ahead to build. Most of the tutorials listed in this article offer in-depth steps on how to build a window well cover.
Thanks for stopping by, if this article has been helpful to you, kindly share it with a friend or family member that might need a DIY window well cover.