8/20/12

how to organize embroidery thread

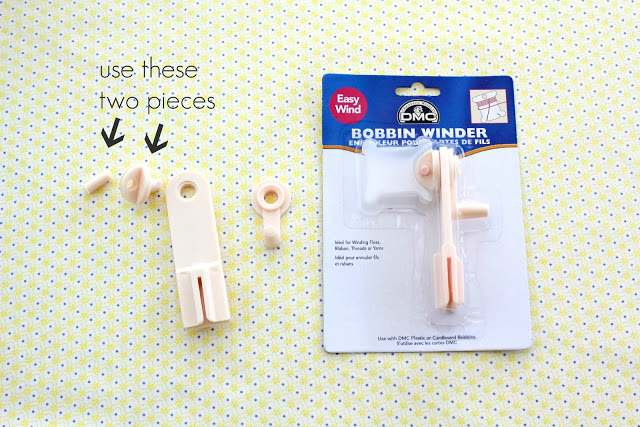
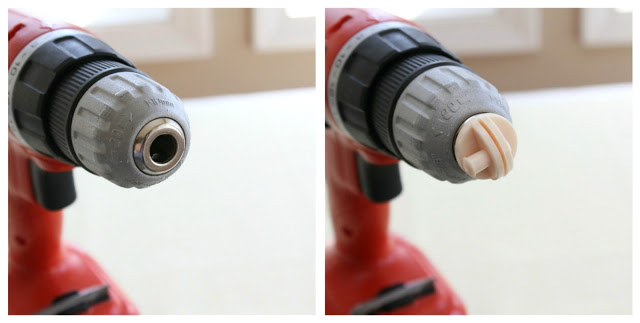
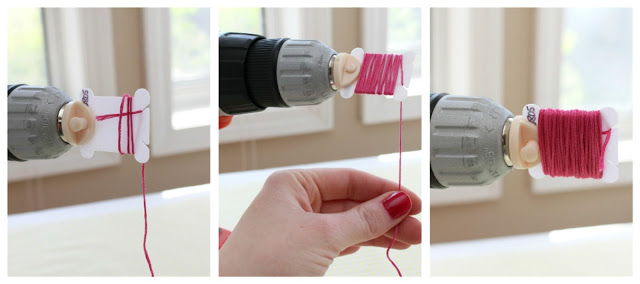
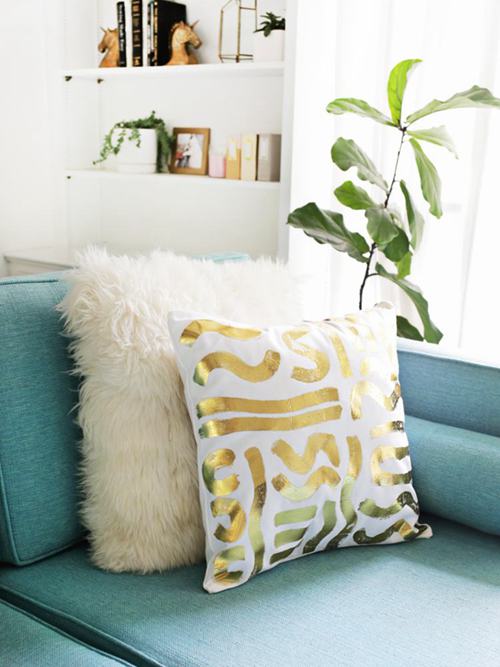
 As I was going through my drafts folder, I realize I have quite a few unposted posts from guest spots (I didn't want to say "post" again so I said spots) I've done over the past six months. Since the craft well has run dry over here, I figured now is a great time to share them. The content of this post might look familiar as I have already posted about it on my blog here. But guess what? I used the same idea for a contributing post on 30 days and now I am using it AGAIN here. Craft well = dry. Told you. To my credit, the pictures you are about to see are much better than the first time I posted this, and that makes sharing this post 3 times ok. I just made that rule. You can post whatever you want as many times as you want as long as your pictures get better. 

---

I have quickly accumulated a collection of thread and I had to figure out a way to store it all in an organized, space efficient way. 

 
At most craft stores, you can buy plastic organizer boxes and small cardboard or plastic cards to wrap your thread around, but winding all that thread by hand is quite a job. My solution? An electric drill. Confused? Read on...


I found this bobbin winder by DMC at Micheal's (you can also find it on Amazon) with the intention of using this to wind all my thread. It clips to the side of the organizer box and you are meant to hand crank the thread onto the cards. After doing that a few times, I realized it was still going to take me too long to finish. 

I had to think of something that would do the cranking for me. Enter the power drill. 


I dismantled my bobbin winder and figured out that the card holder piece fit into the drill where a drill bit normally goes. Just tighten the plastic piece in there and you are almost ready to go.


Before you start winding your floss onto the card, you will want to write the color number onto the card and loosely unwind your thread. If you try to wind it without loosening it up, the drill pulls the thread so fast that you will end up with a big huge knot of floss. The kind of knot that ends up in the trash because it is just that bad. Trust me. 


Insert your card and secure it with the peg, and wrap your thread a few times to get it started. Now you are ready to fire up the drill. As the thread winds, guide it with your free hand so that it doesn't pool in one area. In about 10 seconds, your floss is wound and ready to be stored. 


Winding and organizing all your floss can still be a big job, but the drill winding method has saved me so much time. I hope this helps you in your embroidery organizing endeavors!
Photobucket

18 comments:

  1. Your pictures of the finished bobbins would make beautiful studio art. :)

    ReplyDelete
  2. Pretty! Lucky for me I don't have a lot of embroidery thread (yet), because I don't even have time to THINK about winding it (even with a drill). Great tip, though! I'll keep it in mind for the day my collection and free time expand, hopefully significantly. :)

    ReplyDelete
  3. What a brilliant tip. I only wish I hadn't read it after I'd hand wound 3 boxes of embroidery thread.... I can't really blame you though, after all, I should have read the post the first 2 times!! Thanks for sharing, I aquire thread all the time and this is really useful.

    ReplyDelete
  4. Awesome idea! I did wind all my bobbins by hand...years ago. Then I made a list of the numbers of the thread colors which I taped to the inside of my storage boxes so I know at a glance if I have a particular color on hand.

    Debbie...(O:
    ><>

    ReplyDelete
  5. I have seen this post before, but it is so genius, I think it is definitely worth sharing again! I need to do this next time I get any floss. I usually just wind them by hand. (Oh, and I love your rule of if the pictures are better you can post it again. I might have to steal that one when I don't have time to post new content!) :)

    ReplyDelete
  6. The drill is a fantastic idea!

    ReplyDelete
  7. I'm using this concept for baker's twine onto wooden spoons!!!! Thanks!!!

    ReplyDelete
  8. Thank you, this makes it so much easier...all the floss I had sitting in bags are now being put on bobbins. Thank you again for a wonderful idea.

    ReplyDelete
  9. Just found you blog -- what a brilliant way to use a drill!! I have a question though - using the bobbins to store your thread, don't you find there are kinks in the thread after a while?

    ReplyDelete
    Replies
    1. Thanks Mimi! Yes, there are kinks in the thread, however, they do not affect the quality of stitching. Once you get going with the thread, whether it be for cross stitch or embroidery, you can't see the kinks in your finished work.

      Delete
    2. I was going to ask that too. Although you can't see the stitches in the finished work, does it make it more difficult *as* you work at all? I read on another blog that winding thread up like this causes it to twist more as you're stitching; do you find that?

      Delete
    3. I've never had a problem with the thread twisting. I've always stored my thread like this, so maybe it's just that I just can't see a difference from wound and unwound thread. I think there is also a difference in which way you wind the thread - clockwise or counter clockwise, but since I've never been bothered by it I've never looked into it too much. I'd be interested to read the other blog you are talking about. Would you share the link?

      Delete
    4. Sure (found it after some digging around!), it was at http://www.zombieswearinghelmets.com/2012/03/diy-embroidery-floss-storage.html, in the comments for that post. I certainly think your method of storing floss is neater & prettier, but even though I've only just completed my first embroidery project, twisting has become a real pet peeve for me already. I was always having to stop & separate the strands. I'm amazed you've never had a problem with the thread twisting, mine did it constantly; do you use Threadheaven? Perhaps I'm doing something wrong in how I'm stitching.

      Delete
    5. I do use ThreadHeaven, and I also stop every couple minutes and let my thread correct itself by letting the needle and thread hang down from my work and straighten out. I also stitch with shorter lengths of thread. A good rule of thumb is no longer than the length of your palm to your elbow. I do still get a tangle every now and then, but not too often. Hope this helps you out a bit!

      Delete
    6. Ah ok, well I don't do any of those things (I'm especially naughty about using long lengths of floss!) I definitely going to try your storage method too; it just looks too neat & beautiful to resist & hopefully with your tips I can avoid twisting.

      Delete
    7. Allison, also notice that some embroidery flosses have a sheen that is very pretty. Not the metallics or rayon threads, just the regular floss. If your working floss is too long, it gets pulled through the fabric so many times that it can wear that lovely sheen away.

      Delete
  10. I'll add that thread also is mfg. with a "nap"(??). In other words the way it is wound when being mfg. leaves the little cotton fibers all going in the same direction. If you thread the wrong end of the thread into your needle there will be more resistance against the thread and cause the thread to knot those little fibers together. If you're feeling the resistance or having problems with knotting, simply un-thread your needle and re-thread with the opposite end of the thread. See if the thread doesn't pull through the fabric more smoothly then. The same is true of yarns etc. Good luck!

    ReplyDelete

I appreciate each and every lovely comment you leave!