Are you thinking of redoing your kitchen or bathroom floor? While this process involves cutting of tiles, it is important to have the right tool for the job. If you are opting to add tile floors, one of the tools you will need is a Wet Tile Saw.
A Wet Tile Saw is a powerful tool specifically for cutting tiles to size. It is designed to ensure precision and delivers straight cuts of tiles.
Owning a Wet Tile Saw is one thing, and learning how to use it is another. With the complex design of this type of saw, you can find it hard to use it. This is why I have compiled this article to explain the steps you need to take to use it effectively.
Table of Contents
What are the parts of a Wet Tile Saw?
- Handle. Convenient for you to move the device.
- The shoe. This is the part of the wet saw that you actually guide across the piece of tile that you’re cutting. It helps to control the blade’s angle and keeps your wet saw firmly on the tile.
- The Trigger. Pressing the trigger switch turns the wet title saw on, and releasing it turns the tool off.
- shoe lock. Make sure you can relock the shoe when you reposition it.
- Rubber Mat. The mat is usually made of rubber, which ensures that the device can be stably fixed to the work table and does not slide when working.
- Bevel Adjustment. It could slides and be locked on the shoe, allowing you to precisely adjust the cut length of the tile.
- 45° Bevel Adjustment. With it, you can easily cut the edge of the tile to 45 degrees.
- Water tank. It is used to store the cooling water needed during the operation of the equipment.
- Safety Guard.safety protection.
Understand How A Wet Tile Saw Works.
A Wet Tile Saw has a pump that sprays water onto the tile when cutting. This process helps to prevent cracks due to the cutting tension. The blade of a Wet Tile Saw stands out from others; it does not have teeth.
The design of the blade makes it super easy to use for delicate materials. When cutting tiles, this saw ensures straight cuts to fit in corners and uneven edges. It comes in handy for large projects where you need to cut and size many tiles at ago.
Steps To Follow When Using a Wet Tile Saw
- Prepping
The first step is gathering all the supplies you need using the Wet Tile Saw. You will need plenty of clean water, the Wet Tile Saw, and safety glasses. You will also need a tape measure and a marking pencil.
Using the tape measure, determine where you want to cut the tile. Use a pencil to mark a line depending on the measurements. Drawing the cut line contributes to accuracy when cutting straight lines and angles.
- Securing the Wet Tile Saw in place
Like other power tools, it is essential to position the Wet Tile Saw in place for functionality. The best place to position the saw is a sturdy, stable table. If you have an already-set work table, ensure it stable and prevent inaccurate cuts.
- Filling The Reservoir With Water
All Wet Tile Saws work with a trough of water usually mounted under the cutting surface. With some designs, the trough is removable while with others, you have to use a pitcher to fill it. When filling the water, ensure the pipe is completely submerged.
- Positioning the Tile
The first thing you need to do is adjust the fence. This stage ensures the blade lines up with the cut line when you push the tile against it. You should note that it is best to leave the widest part of the tile between the blade and the fence. This setting ensures your hands are as far as possible from the blade.
In a situation where you need to cut the tile diagonally, you will need to use a miter guide or speed square. Use this between the tile and the fence to keep the tile at a 45-degree angle to the blade.
If you are making partial cuts, such as L-shaped cutouts, set the tile as you would for a complete cut. You can then slide through until you reach the point where the marked lines meet. After this, you set the tile on the other side to cut the other side.
If the blade comes down from the top, lay the tile face up on the saw. The first contact of the tile and the blade should be the top side.
- Turning the Saw On
Switch on the saw and wait for the water spray onto the tile. If you start running the blade before the water spray, this could result in inaccurate cuts or cracked edges.
- Feeding the Tile into the Blade
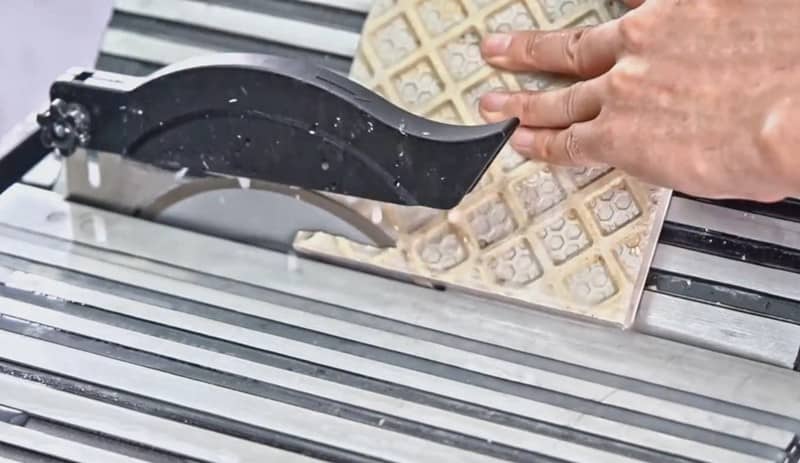
With a well-aligned tile and a sturdy grip, feed the tile slowly into the blade. Use the marked line as the guide to ensure a straight cut. It is essential to let the tile slide in other than pushing it faster than it would go naturally.
Pushing it faster can result in breakages due to the high pressure and tension. Also, take caution when feeding the tile and move it slowly at the edges as most breakages occur at this point.
At this stage, ensure the water source is running all through the duration of cutting the tile. You want to ensure consistency with the blade running through for a straight cut.
- Finishing up
Wait for the blade to complete cutting and carefully pull the cut pieces. Turn off the saw as you prepare to cut the next tile. You want to prevent any risks of accidents with running power tools.
Video tutorial on the steps to follow when using a Wet Tile Saw
Here is a simple guide that you can follow to use a Wet Tile Saw and achieve a clean cut. This video explains the process in detail.
Safety Tips When Using a Wet Tile Saw
A Wet Tile Saw is a powerful tool and, if not used correctly, can pose potential risks and unforeseen accidents. The following precautions are important to follow.
- Pay attention to the water hose and the power cord location. You want to set your Wet Tile Saw in close access to these two.
- Ensure both sources; water and power do not mix. Otherwise, it would create a dangerous situation.
- Wear the right safety gear to protect yourself from dust and debris from the cutting process. Consider wearing safety glasses to protect the eyes from any chips.
- Keep your hands away from the blade at all times.
- Use a push stick towards the end of the cut to keep your fingers away.
- Clean the water in the trough continually. If you are cutting many tiles at a go, the chips may collect in the water. These can distract the blade when cutting and could easily hit you in the process.
Conclusion
A Wet Tile Saw saves plenty of time and ensures you have straight cuts of tiles. If you are planning to install a tile floor or renovating your bathroom walls, then a Wet Tile Saw will come in handy. Although most people find it a little complex to use, it is one of the easiest power tools to understand.
I hope the steps above will help you understand how to make use of your Wet Tile Saw. As always, if you have any questions about the process, feel free to leave a message.





Ask Me Anything