Have you recently found your mailbox isn’t looking as good as it once did? Are you responsible for accidentally hitting the mailbox with your car? Or has the weather just gotten your mailbox looking like a weeping willow?
We’re going to run through the various ways you can install a mailbox in an existing wooden or metal pole and ways to install a mailbox without the need for concrete at all!
Despite email and other forms of modern communication, a mailbox is still important. We will show you how to install a mailbox.
Table of Contents
How Deep Should a Mailbox Post Be?
To get the best results for your mailbox post, you’re looking at a third of the post being below ground level. In terms of measurements, the perfect depth for a standard mailbox post is 20 to 24 inches in the ground, which is considered the best depth for optimized stability.
The depth, as stated here, is to ensure that the mailbox that will be attached to the mailbox post is on a support that can handle the weight without moving based on slight elemental intervention.
A massive warning that needs to be read, reread, and adhered to is the idea that going too deep can have dangerous potential repercussions. For example, going too deep can result in the destruction of essential wires, pipes, or other underground structures that will end up costing a great deal of time and money to fix.
Not as bad, but still annoying; if you install a mailbox post too deep, you also risk a harrowing extraction later if you need to move or replace the post.
Did you know that USPS actually has a standard set of regulations for how the orientation of your mailbox should be in order to receive delivery service? Take a look at this short video for further explanation.
How to Install a Mailbox on an Existing Metal Post
In order to successfully install a mailbox on an existing metal post, you’re going to need the following tools;
- Brackets
- Screwdriver (Can also opt for a Screw Gun)
- Galvanized mounting screws
- Cordless drill
Lucking out and having an existing metal post is excellent! To install a new mailbox on the existing metal pole requires a few simple steps to achieve a sturdy mailbox.
Step One: Position The Mailbox
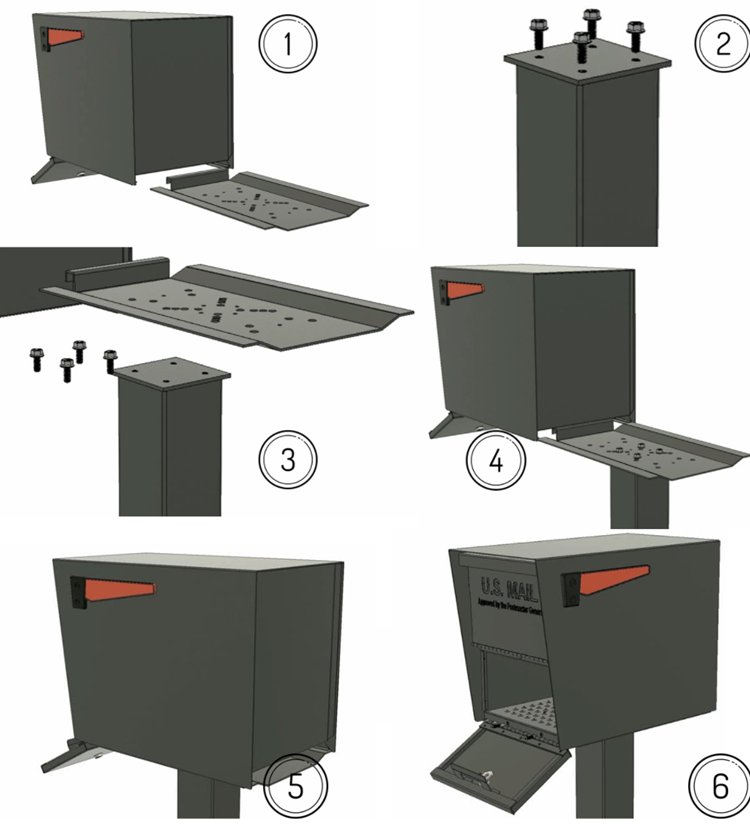
The first step you’ll take to install your mailbox to the existing metal post is to position the mailbox’s center directly over the metal post. The more centered it is, the easier it will be to mount.
Step Two: Position Brackets
Once you’ve successfully centered the mailbox, you’re going to move on to positioning your brackets on the metal post and the mailbox.
Keep in mind that every mailbox is different, so there will be various instructions from mailbox to mailbox. These various instructions may call for specific brackets, and in some cases, might be included with the mailbox.
Step Three: Secure Both the Mailbox and Brackets
With your mounting screws, you’re going to move on to attaching the brackets to the mailbox and metal post with your screwdriver (or screw gun). Make sure to constantly test if the mailbox remains firmly in place to help you decide if it needs further tightening.
In the rare event that the existing pole doesn’t have holes already, you’re going to need to make use of your cordless drill to create holes yourself.
How to Install a Mailbox on an Existing Wood Post
In order to successfully install a mailbox on an existing wooden post, you’re going to need the following tools;
- Brackets
- Screwdriver (Can also opt for a Screw Gun)
- Galvanized mounting screws
- Cordless drill
Step One: Measure Your Mailbox
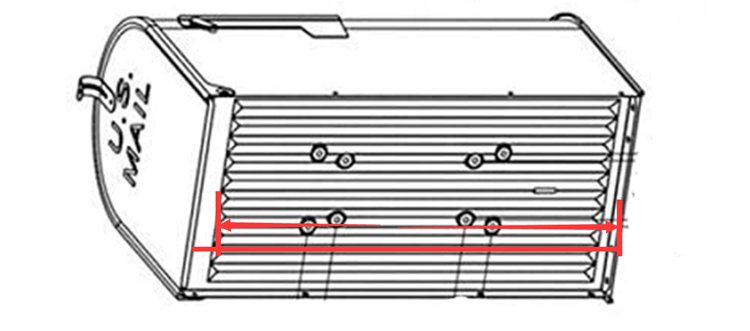
The first step you will need to take is measuring the mailbox’s length on the bottom before subtracting half an inch. The reason for the deduction is to cut the required length of step two.
Step Two: Cut With Your Saw
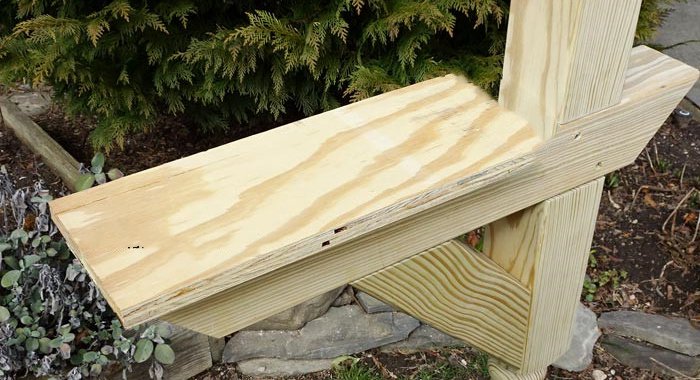
When it comes to the saw, you can either use a standard handsaw or go big and use a circular saw. You’re going to cut the 1" by 4" board length determined in step one. The final result will be the correct measurements to have the mailbox door open fully without issue.
Step Three: Center Extension
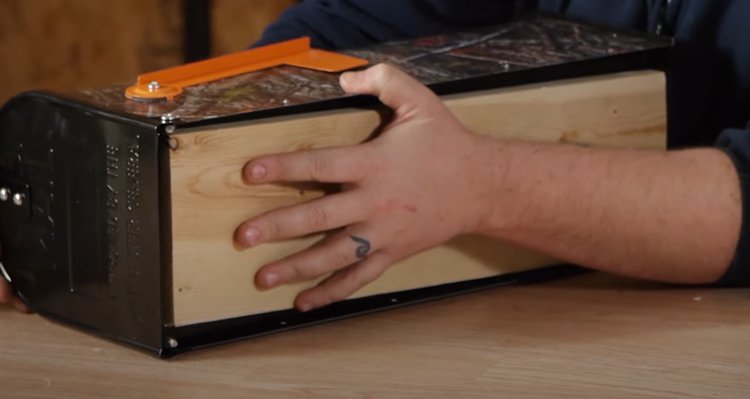
Now you’re going to take the 1" by 4" board and place it on the wooden post’s extension arm before attempting to center it correctly. The 1" by 4" board’s four-inch side needs to butt up against the wooden standing post. The point is to allow the mailbox to sit on the 1" by 4" board flat.
Step Four: Install Screws
Taking your galvanized screws, you’re going to install them in the front, middle, and back of the 1" by 4" board, as well as the extension arm. On each section, you should use two screws to help promote strength and stability.
Step Five: Line Up The Mailbox
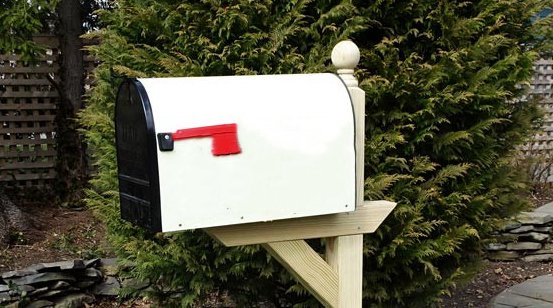
Take your mailbox and position it on the 1" by 4" board board while ensuring it lines up with the board’s back end. You need to have a 0.5-inch gap between the mailbox’s front and the front end of the board.
Step Six: Mark Mounting Holes
Using a pencil or marker, you’re going to mark out some holes where you intend to mount the mailbox.
Step Seven: Drill Holes
With the markings done, you’re going to take your drill and create the necessary holes for your galvanized screws. Keep in mind to work towards using the drill to drive them straight and in line so that there are no issues later when attaching them.
Step Eight: Install Mailbox
Time to reap the benefits of your handiwork and install the mailbox onto the 1" by 4" board board with your galvanized screws. This can be achieved either by screwing the bolts by hand or using a specialized screw gun.
How to Install Mailbox Lock
In order to successfully install a mailbox lock, you’re going to need the following tools;
- Brackets
- Screwdriver (Can also opt for a Screw Gun)
- Galvanized mounting screws
- Cordless drill
You’d be surprised how easy it really is to install a mailbox lock. With so many people wanting to tamper with mail for nefarious purposes, it’s vital to protect your mail at all costs.
Step One: Assessing the Mailbox
The obvious reality is that setting up a new lock rather than replacing an existing one is more straightforward. However, that doesn’t mean replacing an old lock is complicated enough that you can’t do it yourself!
In the event of an older bolt, you’re going to need to first remove the old bolt without damaging the mailbox in any way. Most conventional mailboxes will have a tall horse-shaped pin. This horse-shaped pin is what keeps the lock in place. Then you need to find the slight tab-like depression in the old lock latching mechanism and disconnect the lock by rolling it out of the position.
Step Two: Type of Lock
Now it’s time to replace the lock or install a new one, but you have to decide which one you’re planning to go for out before going to the store to get one.
Cylinder Lock
Cylinder locks are preferred by most as they’re easy to handle bolts that don’t offer any less safety to your mailbox security. Additionally, cylinder locks usually get sold with keys to provide a secure and easy way of accessing/securing the mailbox.
Tubular Lock
Tubular locks are a simple design mailbox lock that is fairly common to all mailbox types. In order to fit into the cylinder part of the lock, you need to prep a hole. This cavity can be built into the mailbox’s front door.
A majority of devices are retailed within a set standard of sizes. The hole usually needs to be at a minimum of ⅝ inches in width and ¾ inches in height. Then, using a drill, you’re going to make the gabs. In the event of it being a metallic mailbox, you’ll have specialized brackets to secure the mailbox latch into its necessary location.
Step Three: Placing the Lock
Take your lock and remove the excess packaging, and place the lock bar into the door. Turn inward according to the mailbox door ground and then reactivate its fastening pin. This part isn’t complicated because there is only a single frame in the bracket where you’d need to attach a locking pin.
In the event you have a metallic mailbox. You’re going to place the lock bar in the tiny available gap between the doors before tightening them accordingly. Suppose you’ve repositioned the bracket and left a noticeable space where the lock is installed. In that case, you can just use an adhesive past to neaten it up.
Step Four: Check Everything Works Correctly
Finally, you need to check that everything works the way it was intended to work. What we specifically mean by this is, do the provided keys actually open the mailbox?
If the answer is no, you need to contact the manufacturer and get a replacement immediately. Don’t delay on this step as you won’t be able to access your mail during this time. However, you can remove the lock for now and leave the mailbox unsecured.
How to Install a Mailbox Without Concrete
For some people, the idea of using concrete is just unappealing for whatever reason. However, you don’t have to use concrete in order to secure your mailbox in the ground. There is another way.
In order to successfully install a mailbox without the use of concrete, you’re going to need to consider the ground anchor!
Step One: Acquiring The Ground Anchor
You’re going to want to shop around for a ground anchor that’s made of galvanized steel and is also over 2 feet long. These requirements provide a sturdy foundation for your mailbox as it goes in the ground deep enough to keep it in place.
Step Two: Twist
One of the primary advantages of the ground anchor is that not only are you avoiding concrete. You’re also avoiding digging holes. Ground anchors usually come with a 20-inch crossbar which is used as leverage to twist the anchor into the ground. Finally, you need to attach the mailbox post using five lag bolts, but the bracket itself comes with pre-drilled holes, so your focus is the pole.
Your most prominent area of concern beyond the pole and anchor should be all about location and sticking within regulations. The actual process of getting the anchor into the ground and attaching the mailbox pole is easy. But, it’s making sure everything is where it should be that can trip people up the most! Check with your local rules and regulations before making any drastic decisions.
Step Three: Set
Now that the anchor is in place, you’re going to place your standard 4x4 wooden mailbox post into the bracket. Make sure it is standing straight and is the correct height according to regulations. If everything appears to be in order, you’re going to go ahead and attach the lag bolts (which should have been provided) through the already existing holes using a wrench or socket set.
That’s it. No, really, it’s that easy! No concrete, no fuss, just a gold old trust ground anchor.
How to Install Wall Mount Mailbox
In order to successfully install a wall mount mailbox, you’re going to need the following tools;
- Cordless drill
- Masonry/rock bit (only required if you’re drilling into a concrete or brick wall)
- Level
- Tape measure
- Marker
Before installing a wall-mounted mailbox, it’s crucial to research your postal carrier, as some carriers won’t utilize anything but the standard curbside mailbox.
Step One: Measure
When taking into consideration the measurements of your mounted mailbox’s height, make sure it’s accessible to both you and your mail carrier. A reasonable height for your mailbox is between 41 and 45 inches above your porch, sidewalk, or the surface of the road in front of your home to comply with post-mount length regulations.
Step Two: Mark
Now that you’ve done the height measurements, it’s time to mark off the locations where you will install the wall mount. Once you’ve decided and are happy with the decision, you need to mark off the individual areas with a pen or marker to help you when it’s time to drill.
Don’t forget to use the level to avoid ending up with a crooked mailbox.
Step Three: Drill
You’ve marked out the areas where the mount will go, and now it’s time for the drilling. First, review the guidelines provided with the wall mount to ensure you’re going deep enough for the screws that you’ll add later.
Generally, you don’t need to go too deep into the wall, but in some cases, you will end up in a situation where the wall mounts require a bit extra.
Step Four: Mount and Secure
The final step is taking your screws and inserting them into each bracket hole you created. Next, you’re going to tighten them and test the strength of the mounted mailbox consistently. Once you’re on the verge of completing this step, just measure the mailbox to ensure it’s correctly leveled and isn’t skewed.
Clear the debris from your hard work, give the mailbox a little clean to remove any dust.
FAQ
What’s the best mailbox post material?
For mailbox posts, wood is often considered to be the best option. In particular, cedarwood has been crowned the best wood for a wooden mailbox post as it doesn’t warp or shrink as much as other woods do over time. However, it is a fairly costly wood, so some avoid it as their final choice.
Are there specific regulations when it comes to installing a mailbox?
Yes, there are specific rules and regulations when it comes to installing a mailbox. The USPS has requirements of where a mailbox should be in order to receive mail.
- Position the mailbox 41 to 45 inches from the surface of the road to the base of the mailbox/point of entry.
- Place the mailbox 6 to 8 inches back from the curb. In the event that you don’t have a raised curb, you’ll need to contact your local postmaster for further guidance.
- On your mailbox, put your home or apartment number to identify which mailbox belongs to which home.
- In the rare event that your mailbox resides on the opposite side of your main property, write the full address on the mailbox to fully identify who mailbox it belongs to.
- Additionally, USPS requires slots for a locking mailbox to be 1.75 inches high by 10 inches wide.
Are mailbox locks necessary?
Are they required? No. A mailbox lock is entirely optional. However, when asked if they’re necessary, the answer, in our opinion, is YES.
Mail tampering and theft are far too real not to be concerned about the possibility of missing mail. However, the extra layer of protection is more than just reassuring. It’s also protection against the loss of essential documents and other things that can help deter the possibility of identity theft.
In Closing
There are no excuses! You now know all the various ways to install a mailbox, protect your mail, and how to address the multiple rules and regulations of USPS to receive your mail.
If you know a friend or neighbor who might also need some help in the mailbox department, share this article with them. Or, if you see a neighbor who should consider removing and replacing their old and unsightly mailbox, subtly share this with them in passing.
Lastly, show us your handiwork and let us know how it goes!







Ask Me Anything