If you don't want your office or house to be too stuffy and cluttered, you should build a ceiling mount for your projector, this will help to secure some space around the house and your work area. We have put together a few DIY project ceiling mount ideas for you.
Most of the projects in this DIY guide are cheap and easy to make. Feel free to make adjustments that will fit your needs. Also, you do not require a specific skill to build any of these, the guide would give you all the easy-to-follow steps.
Table of Contents
1. Quick Projector Ceiling Mount
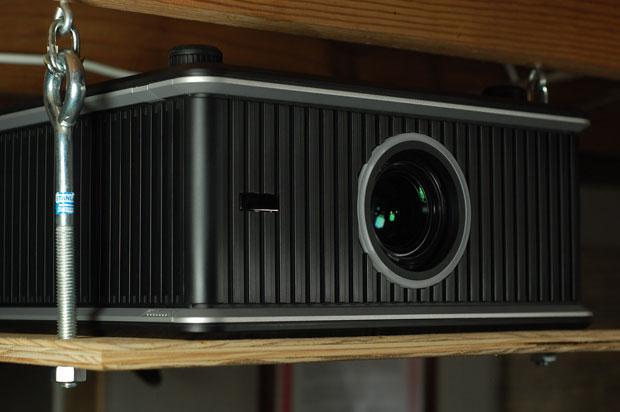
Have you been looking for a quick way to build a DIY projector ceiling mount? This DIY projector ceiling mount is very quick to set up? It is made from an eye screw, lap link connector, eye bolts, tape measure, and drill press.
Start by measuring the board, make sure it's a few inches longer and wider than thee down between the floor beam and the projector. Drill holes at every corner of the board (big enough to fit the eye bolts) at the exact distance between joists with a drill press to ensure the hole is perfectly vertical.
Hold the board up to the joist and mark through the joke where the eye screw will be installed. Drill holes in the joists and install the small eye screw. Open the lap link connector with two needle-nose pliers and join the eye bolt to the eye screw.
With these few steps, your DIY projector ceiling mount should be ready in 2 hours.
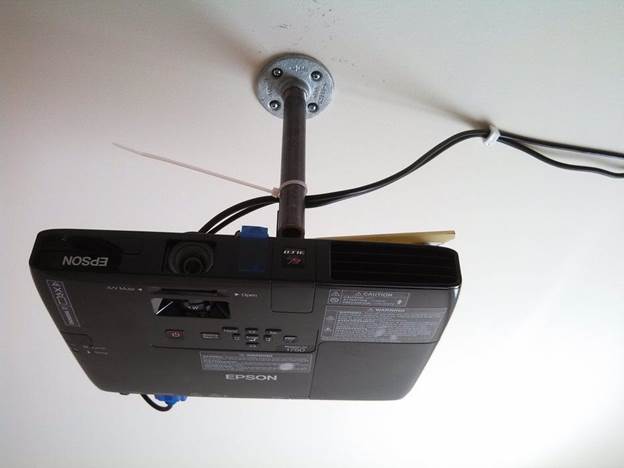
2. Cheap DIY Projector Ceiling Mount
Buying a projector ceiling mount can be pretty expensive. That is why this DIY is the best for you. The cost of making it is as low as $15.
Most of the materials used are gotten from home depot. Other materials used are hand saw and drill, scrap plastic or wood, and constant torque position control hinges.
To get an optimum result, Mark out the position of mounting holes on a sheet of a screwed metal board or plastic. Make sure there is enough space between the board and the projector to allow easy passage of the heat from the projector.
Drill two holes on one end of the pipe to mount the hinges, then drill to holes at the center of the mount board and attach the hinges to the board. Attach the pipe to the floor flange and set up the direction of the projector. Mark the mounting hole on the flange on the ceiling and detach the flange.
Reinstall the flange to the ceiling using drywall anchors and screws. Put the projector back on the flange. Your projector ceiling mount is ready for use.
3. DIY Plywood Projector Ceiling Mount
This plywood projector ceiling mount is made from 4 main pieces- one main piece for the projector to sit on, two side pieces and one piece to hold other components of the projector such as cables.
On the two side pieces, there are notches to hold the platform snugly. The notches can be created through the following methods: with a CNC router, hand mill, or aluminum profile.
The platform is fixed into the notches and the projector is placed on it. Then the upper notches on the other side pieces are attached to the ceiling.
Make sure there is a space between the platform and the projector to allow easy passage of heat. Also, accurate measurement is needed to position the projector to the right dimension.
4. DIY Ceiling Mounted Projector Bracket
This ceiling-mounted projector hanger is made from PVC pipe. The material needed includes ¾" PVC tee, ¾" 90 degrees PVC elbow, ½" thread male adapter, cable ties, and superglue.
Using a PVC cutting tool, cut the PVC pipes into 2 ¾" pipe, 2 3/6" pieces, a 10" pieces and a 1" piece.
Slide the ¾" pieces into the tee fittings and glue it, take the four elbow fittings and glue them together to make a square shape. Glue the 1" piece to the tee fittings. Screw the floor flange fitting to the ceiling and thread the PVC bracket into it.
Yes, it is this simple and cool.
5. DIY Cheap Projector Ceiling Mount
The materials needle for this simple and cool DIY project mount are a drill, wooden board, and screw.
This is the cheapest and the fastest ceiling mount you can try out by yourself. It is made from a single piece of board. Drill holes in the corner of the board fit the projector hinges. Screw the board to the ceiling and mount the projector under the board.
The minimal time, energy, and cost needed for this project made it stand out.
6. How To Install A Projector On The Ceiling
The design of this projector ceiling mount requires some distinct decisions before taking any step. you have determined where you want to position your projector screen- preferably near a wall to make the wire discreet as possible.
Take accurate measurement of the distance between the wall and the screen to make sure the throw distance between the projector and the screen is sufficient.
Flip the projector upside down and screw the mount bracket to the projector. Make sure the bracket and the lens are inline. Mark the mounting hole on the ceiling and drill it with a hand drill. Screw the mount bracket to the joke and fit the projector.
7. Handmade Projector Ceiling Mount
This handmade project requires a little skill of woodworking to make the wooden box. But if you don't have such skills, you can take it to a professional for help. The materials needed for this project include woods, lag bolts, wing nuts.
The wood is used to frame the wooden board into an open box where the projector will sit. The mounting bracket is also made from wood. The mounting bracket is passed through the ceiling. The box was designed in a way to allow easy adjustment of the projector angle.
The process is fun-filled and amazing.
Also see : 28 Stylish Bathroom Ceiling Ideas
8. DIY Projector Ceiling Mount
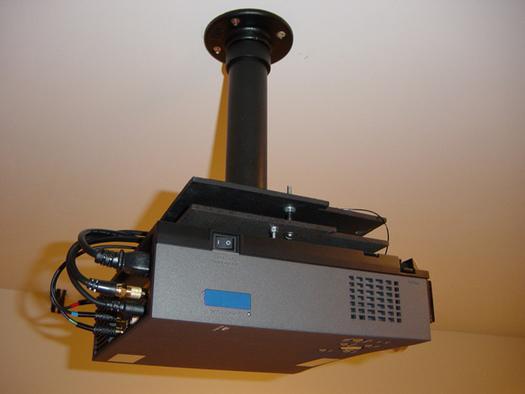
This DIY uses a dual-plate design. The design process is very simple and straightforward.
Attach a PVC pipe to the mount bracket to lighten the weight. Coat it with black textured paint. Mark and drill the mounting hole to the ceiling, then screw the mount bracket to the hole.
Fit the double plate to the projector with a small 4m screw. Fit the plates with the pipe and you are good to go.
The design and color of this amazing DIY projector mount make it very cool and fun to try out. More so, the materials needed are not very costly and it is strong and reliable.
9. How To Make A Projector Ceiling Mount
When using a mounting bracket for a projector ceiling mount, take note of the screw on the projector, most of it doesn't go inline with the mounting bracket. To correct this, you can use a piece of wood, cut the wood into two and screw it to the projector. Then, make another screw on the wood that fits the bracket.
Fit the bracket to the projector, make sure you add some spacer in between. Slide the projector into the already mounted bracket on the ceiling and boom! Your projector is working properly.
10. How To Build A Cheap Durable Projector Mount
This projector mount is very durable because of the rigidity of the materials used. It is made from steel, mount bracket, and drill.
Drill 6 holes on each of the steel bars and screw it to the projector. Attach the mount bracket to the already made bracket on the ceiling. Screw the bracket to the holes on the steel bar. The projector is attached upside down to allow clearer visibility to the screen.
Yes! It is this simple and cheap. The steel used can be found in a home depot. It is strong and reliable. Try it out and see.
11. How To Make A Projector Hanger
In making this DIY projector mount, you will need a pipe, an old ceiling fan hanger, a wooden board, and screws.
With accurate measurement, cut almost half of the pipe into 4 pieces. Bent the edges of the cut and screw it to the wooden board. Pass an old ceiling fan hanger through the remaining part of the pre-cut pipe. Place the projector in the space created between the wood board and the pipe.
Attach the ceiling fan hanger to the floor flange in the ceiling. The process is simple and inexpensive but the measurement is very essential to accurately position the pipe.
Conclusion
Little or no skill is required in building a DIY projector ceiling mount. However, you will need to be creative and smart. Most of the projects listed above are easy to make and require tools and materials that are easy to come by.
Thanks for stopping by, I hope this article has been helpful to you. Show us some love by sharing with your loved ones.




Ask Me Anything