
A keyboard stand is quite important in the piano world. I have been playing the keyboard for a long time now and I noticed that keyboard stands can be quite expensive to purchase. Thanks to this DIY guide, you do not have to spend a lot of money on that stand online.
We have compiled a list of the best DIY keyboard stands that you can make from your workshop. You might need woodworking skills to build most of the DIY Keyboard stand projects.
You May Also Like:25 DIY Tablet Stand Projects - How To Make A Tablet Stand
Table of Contents
1. DIY Digital Piano Stand
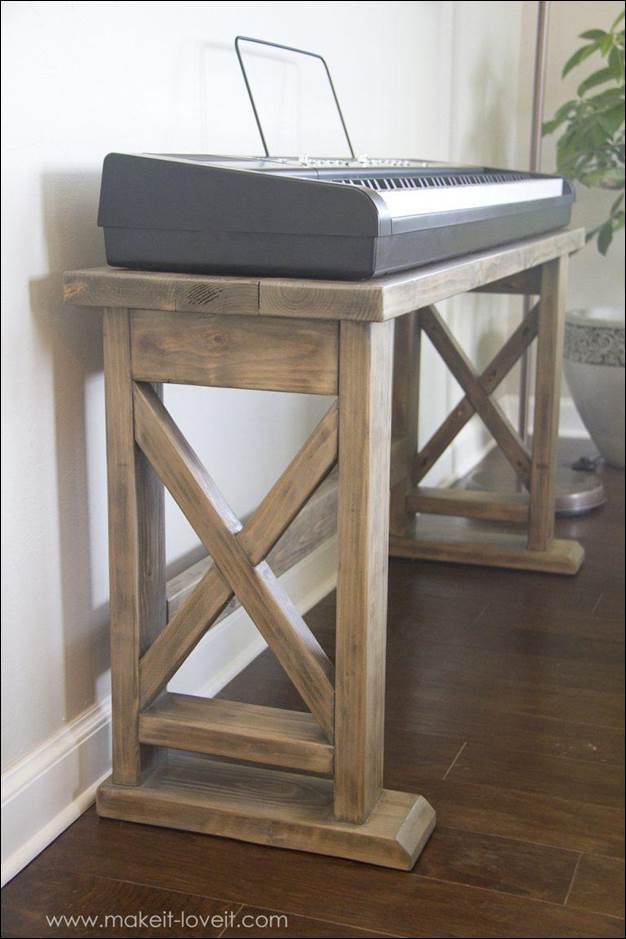
This stand is made from pieces of pine, get yours at the nearest store. Ensure you have the right measurements so you mark out on the wood and cut to size. Make two end pieces and connect with two long pieces by drilling. Cut out your X piece using glue to hold them in place. Repeat the step to have the other side piece. Cut two longer pieces and attach to the same side of both side pieces and screw. At the base attach a piece of wood as support and screw. At the top, place your tabletop and screw to the frame.
For the bench attach side pieces, then like the tabletop, place your seat. Screw and then stain.
2. DIY Keyboard Stand Using PVC
One of the simplest and unique stands so far. Get two long PVC of 106cm each, eight shorter pieces of 13cm with T joints and end cap. Attach the T-joints on the ends of both PVC, Place both PVC in the X position and the pilot hole then fix bolt and nut. Make a PVC piece flat so it gives the stand a position, pilot hole on one end of the flat PVC, at the other end make a slot. Attach the flat pc to one side of the X piece and bolt. Attach 2 short PVC to each T and then paint. Your stand is ready!
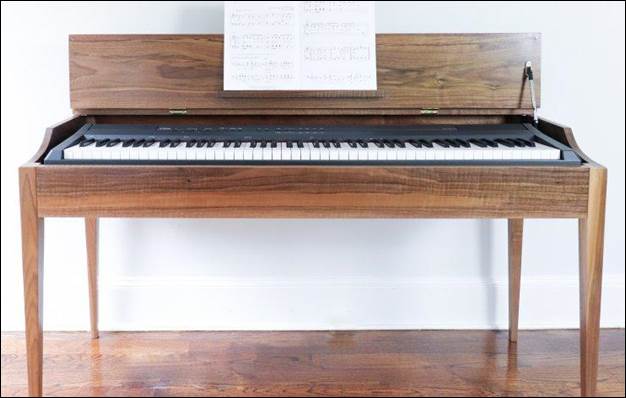
3. How To Build A Keyboard Stand
This is a bit complex therefore will require extra carpentry skills or basic knowledge. This is made out of walnut wood. Cut your wood to size and dimensions. Cut out taper legs. Cut the curve using a band saw. Cut the plywood to size and rip the pie with the size using a circular saw. Make holes with a hole saw at the bottom plywood to avoid sound being blocked.
Use dowels to drill holes in the right location. Sand the pieces before assembling. Put glue and dowels and put the apron into place. Fix plywood into the grooves and attach the tabletop then use a mallet to bang to place. Use fasteners to connect the back of the top to the table, then palace hinge on the exact location in both boards. Sand the wood and coat it. Screw-in fasteners ensure the top is equal on all sides with a combining square, assemble the pieces with fasteners, screws, and bolts.
4. DIY Simple Keyboard Stand
You have a simple technique to follow here. Use wood with a small thickness, ensure your tabletop has the right measurement. The height of your stand from floor to top should be about 71.5cm. Measure the height of your wood, make the legs and bridge them, place yours too by screwing and then paint.
5. How To Build A Flip Top Keyboard Stand
This may also seem complex all the same made out of walnut or you could use lumber. Glue two clamp strips together for legs, sides, and back frame. Cut pieces for back and sides then square off and glue edges. Trim strips down to length and sand pieces, assemble with glue and dowels. Glue top pieces to the outside of the legs and clamp then leave to dry. Use 3 boards for the top, glue two together then install stationary top and fix the flip piece. Use hinges to install a flip piece to the stationary top. Attach slides to plywood for pull out then install and coat or paint the wood.
6. DIY Custom Keyboard Stand
Cut wood and plywood to size. Glue legs before cutting to final size, cut grooves to hold plywood bottom, and cut taper legs also. Prepare plywood panels and create holes underneath for piano speakers. Assemble the sides then attach the bottom of the plywood. Attach the piano top and that's it!
7. DIY Piano Stand With Storage
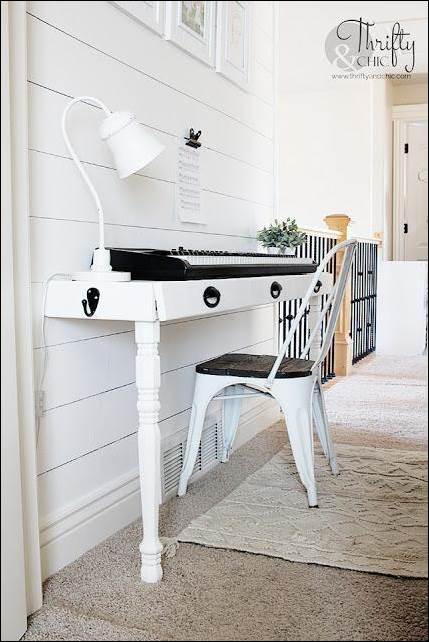
This is a kind of a floating stand, but really beautiful. Most work will be done at the spot so you may have to paint or coat your wood before assembling. Place long wood horizontally against the wall by screws. Anchor 2x2 into the studs and place board on top for piano and also underneath the stud to form storage. Buy turned legs at the store so you just mount it to your frame and screw. Use hinges to attach the front piece from the bottom up. Get a chair and play the piano.
8. Keyboard Stand Build DIY
This is made from pre-milled stair treads and stair risers. Cut your wood to size. Cross sectionally cut your board into half. Make 45⁰ cut at the ends of each board and attach with glue and splines to strengthen. Use dowels jig and drill, glue pieces together, and sand your wood. Painting isn't a bad idea to give it a finishing touch.
9. $30 DIY Keyboard Stand
For those who love it loud, when making your piano stand you may consider an extra stand for your MIDI speakers. Measure and cut out your pieces, clamp top and sides to pilot holes, and drill in screws. Place the top board and screw. Above it place a wood against the wall for as many speakers as you'd love.
10. How To Make A Keyboard Stand
This stand comes with a bench also. Cut out your plywood. Get a straight piece of MDF for a straight edge. Assemble the pieces you cut out for the stand using screws. Design the erected back wood by carving with a jigsaw and attach the carved piece to the frame and screw.
For the bench, assemble the side pieces and place the top, place 2inch foam in the bench, and cut to size. Cover fine cloth and staple it to the bench. Sand wood and paint everything!
Conclusion
That’s a wrap! Most of the DIY keyboard stand projects listed in this article are quite easy to make. Were you able to find a DIY keyboard stand project that you like? We would like to know what you decided to build. Feel free to use the comments section below to leave your responses.


Ask Me Anything