Are you looking to make your own cold smoker plans? Have you built a couple of cold smokers already that don't seem to work the way you want? In the following article I've put together some of the best instructions on how to build your own cold smoker at home.
DIY cold smoker plans can save you a lot of money on your next smoking project. You no longer have to order your cold smoker plans online or in bookstores. You can build them by yourself from the comfort of your own home and have a professional looking cold smoker.
Table of Contents
Prepping - Building A Cold Smoker
Before going through our list of compiled cold smoker plans, here’s a short guide to get you prepped. You should consider these factors as they would help you in creating the ideal cold smoker.
Size
Ask yourself a simple question, do you have a large family and plan on cold smoking of food? If yes, then you might want to opt for a large cold smoker, they are able to contain more amount of food that would be enough for everyone. On the other hand, if you live alone, and you eat small, you should consider building a smaller cold smoker.
Location
Some plans require a large amount of space, we even listed a plan where you have to dig the ground and one where you’d build an Igloo, where you live might not permit you to do these things, be sure to seek permission where necessary before building any equipment outdoors.
Budget
Some cold smokers are expensive to make and others not so expensive, Kindly check to see the estimated cost before diving in on the complete building process.
Small Cold Smoker Plans
If you want to smoke meat but don't have enough space for a full-sized commercial smoker, the best solution is to build a mini cold smoker. There are quite a few ways you can make one.
Mini Cold Smoker Plans are easier to make and cheaper too. The downside is that you would not be able to process a large quantity of food. However, they are convenient to carry or move from place to place, unlike large cold smokers that stay put.
Below are a few.
1. How To Build A Cheap Cold Smoker
| Level | Easy |
| Material | Coffee Maker |
| Cost | $25-$50 |
Food can be flavor-infused with wood smoke by cold smoking. In contrast to hot smoking, there is no heating of the food during cold smoking. Smoking for just a few minutes can significantly alter the flavor of sauces, fish, meat, and vegetables.
You can experiment by using several wood species or by including extra ingredients like star anise or other aromatics. Making a little cold smoker out of materials that are simple to get so that you can have it in your flat was the inspiration for this project.
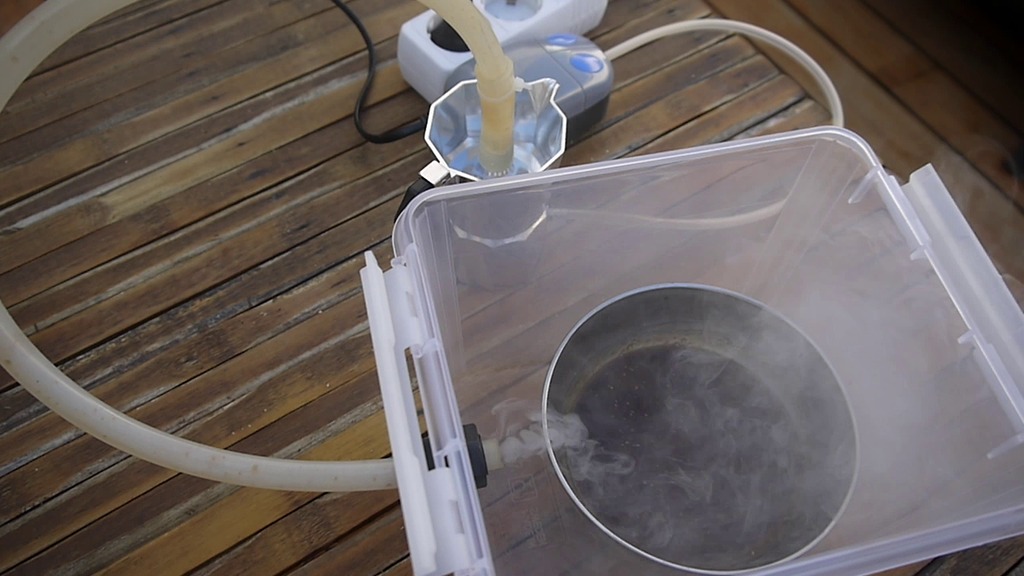
The coffee maker valve must first be taken out and replaced with a pneumatic fitting so that air can be introduced within the coffee maker. Later, a portion of the coffee funnel was cut to allow for easier airflow.
From the coffee machine to the plastic container, connect the silicone tubing. Burn several wood chips just on the coffee funnel, wait a few minutes, then start smoking!
Materials Required
- Moka Coffee Maker
- Plastic Container
- Aquarium Air Pump
- Silicone Tube
- Cable Gland
- Pneumatic air fitting
Tools Required
- Spanner
2. DIY Cold Smoke Generator
| Level | Medium |
| Material | Coffee Can |
| Cost | $30-$90 |
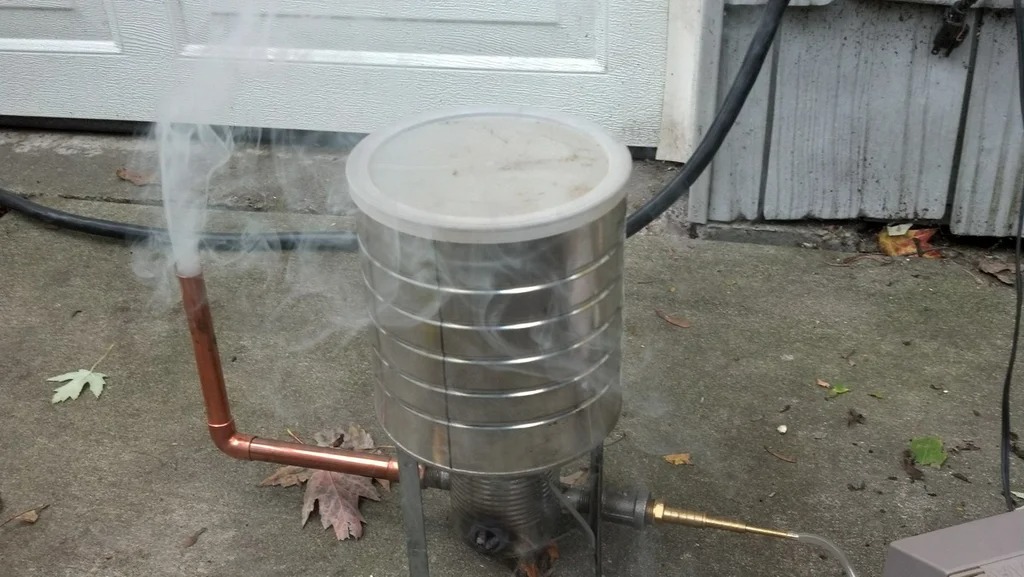
The maker chose to use a 16-ounce can as the burner chamber as well as a coffee can as the wood pellet reservoir; both of these items should be readily available in every home.
Next up is attaching the burner, Mark with a pen where the smaller can should be placed in relation to the coffee can's bottom. Drill a hole through the center of the circular after dividing it into 8 pie-shaped portions. Cut along the lines with a jigsaw so that you may connect these two cans. Use metal screws to fix the smaller can on top after bending the sheet metal up.
The Venturi Tube needs to be prepared next. Make a about mid-length incision in a piece of 8" ⅜" galvanized iron pipe using a drill and a file. It is necessary to connect the plastic hose flowing from the aquarium air pump with a few connectors & brass fittings. Based on what you discover, you may need to experiment a little.
Construct the Cold Smoke Generator and test run; it only requires a small amount of wood pellets to operate and generate enough smoke.
Materials Needed
- 16/14 oz. can
- Wood pellets
- ¼" O.D. plastic hose
- 8" piece of ⅜" iron pipe
- 3 shelf brackets or Some kind of feet
- An old aquarium air pump
- Several brass and copper fittings and pipe
- 36 oz. coffee can
- 6 metal screws
Tools Needed
- Assorted drills
- Drill / Drill-stand
- Metal file
- Hack- Jigsaw
- Screwdrivers
- Pliers
3. DIY Cold Smoker From Cocktail Shaker
| Level | Medium |
| Material | Cocktail Shaker |
| Cost | $25-$28 |
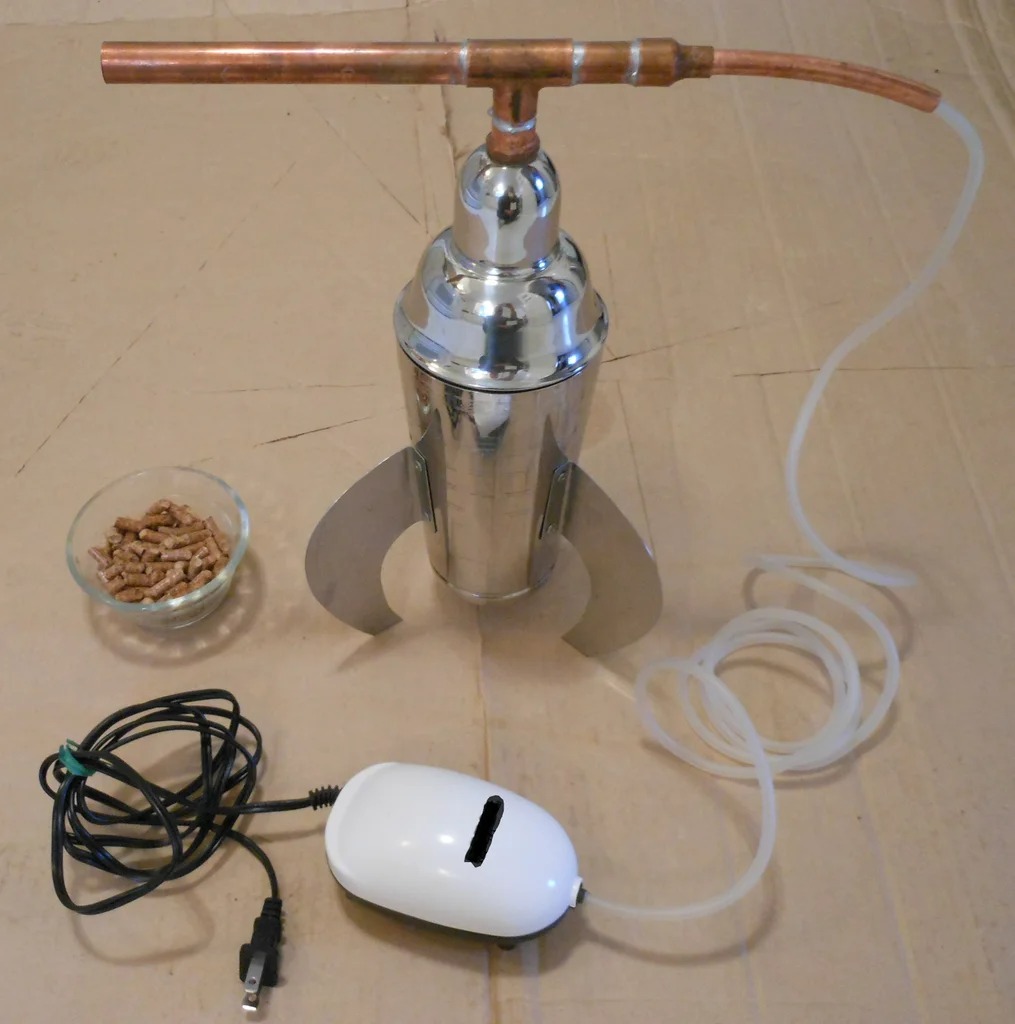
Here's a quick, simple, and affordable method for creating cold smoke that can be used to smoke your homemade malt for brewing beer, make bacon, smoked cheese, or eggs.
For a total cost of roughly $25, including the pump, this one was completed within just 2 hours. It should cost much less money and take much less time if you utilize simpler materials (coffee cans, bean cans, etc.).
Instead of cooking the food, the main goal is to create cold smoke, which will flavor as well as further preserve it. Thus, a steady burn is preferred over a hot smoke. The process of hot smoking is different.
Remember to wear safety gear and be careful when dealing with sharp objects used in cutting, or drilling. Keep in mind that cutty things will injure you and that sharp things are sharp. Be ready, be careful, do it correctly, and save money on emergency room expenses.
Materials Needed
- Cocktail shaker
- Flexible plastic tube for pump
- Fish tank air pump
- Copper pipe fittings (½" male pipe to ½" copper pipe adapter (½" MIP x ½" pipe) = MIP end has Male "Iron" Pipe threads ½" x ¼" coupler (adapter) ½" tee)
- Copper pipe (½" x 6" long ½" x 2" ½" x 1" ¼" x 8" long (¼" ID, ⅜" OD)
- Hardwood chips or pellets
Tools Needed
- Pipe cutter
- Tape measure or ruler
Propane torch - Lead-free solder
- Lead-free soldering flux
- Sandpaper
- Wire brush
- Drill press
- Hammer
- Center punch
4. DIY Cardboard Cold Smoker
| Level | Easy |
| Material | Cardboard |
| Cost | $50-$100 |
During this project, you will be working with a sharp knife, so please take caution to avoid harming yourself or the material you are cutting on.
Make sure that none of the cardboard comes into touch with your selected source of smoke, as doing so could start a fire. This is for creating a cardboard smoker for Cold Smoking use only.
Ideally, you should select a clean box, dry, and smell-free because strong odors can interfere with the smoking process. It is crucial that the racks you select fit within your box when it is put together.
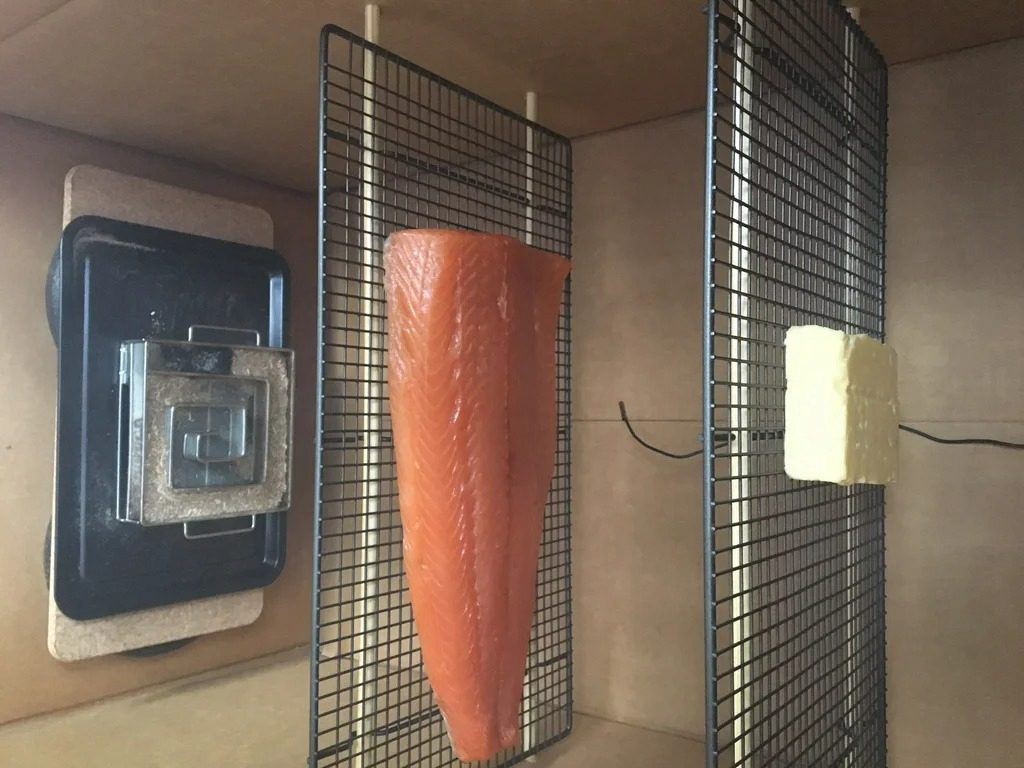
Assembling the box is the first step in the creation process. Mark the small inner flaps for one side of the box, then cut them off using a straightedge and a knife, being careful not to cut through or into the surface below. At least one offcut should be kept.
You must figure out the number of racks you want to fit inside the smoker before marking the holes on the side. The first rack used in this guide is 15 cm from the top, the second is 15 cm below it, and the bottom rack is 20 cm below that.
This cold smoker can be combined with a variety of chilly smoke generators, a few of which can be created using already published Instructables;
Materials Needed
- Baking/Cooling Racks or Oven Racks
- Wood Dowels/Metal Rods
- Small Metal Tray
- Bungee Cord/Tension Strap
- 2 x Plastic Cups
- 2 Small Nails
- Fabric Tape/Duct Tape (Min 50mm Wide)
Tools Needed
- Sharp Knife
- Pencil/Pen
- Wood Drill Bit
- Tape Measure
- Hot Glue Gun
- Small Wood Saw
- Straight Edge
5. DIY Low Budget Cold Smoker
| Level | Easy |
| Material | Aluminum foil baking pans |
| Cost | $10-$20 |
Here's how to make a smoker in five minutes for about $10, whereas other DIY cold smoker projects on our list take longer to build and cost $50 to $300.
Two aluminum foil baking pans, a few wood pellets, stainless steel cooling racks, heavy-duty aluminum foil, and bulldog clips are all you need for this construction.
Bulldog clips are used to secure the two aluminum foil baking pans that make up the smoker's body together. The stainless steel chilling racks are inside the pans, ideally supported by a useful block.
Until you have a pellet tortilla, cover your wood pellets in foil. The top and side of the upper pan and the bottom pan are then both given an air hole.
Put the lit pellet burrito in the lower pan near to the side airhole after lighting it with a blowtorch. You're done once you've placed your foodstuff on the metal racks and secured it with clips.
Materials Needed
- 2 aluminum foil baking pans
- Bricks (optional)
- Heavy-duty aluminum foil
- Hickory pellets
- Stainless steel cooling rack or searing grates
- Bulldog clips
Tools Needed
- Utility knife
Large Cold Smoker Plans
Are you looking for a way to smoke larger quantities of meat at one time? A large cold smoker may be the right tool you're looking for. Large or commercial cold smokers are larger, factory-like equipment that can't be easily transported from one location to the next. However, they can process a lot of food at once making it the best choice for most people.
Here are a couple of large cold smoker plans;
6. Building A Cold Smoker With Wood
| Level | Easy |
| Material | Wood |
| Cost | $60 |
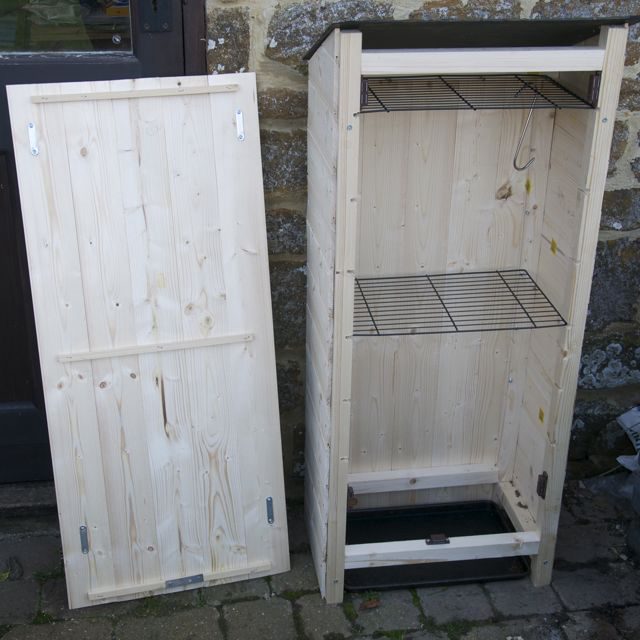
Smoking cold is intriguing. Similar to curing, it calls for more sophisticated equipment and has a similar feeling of culinary alchemy. The trick is to fill an area with dense enough smoke for a long enough time to flavor your meal without heating it to a point where it starts to cook or, worse, where it could start to go bad.
The smoker is 1.1m tall at the front and 1.0m tall at the back. Your choice of rack size will determine the breadth and depth.
Build the frame first. To hold the racks, carve slots in the front vertical timbers. You get to pick the spacings. Next, clad the back and sides, including the triangle pieces at the top of the sides, starting at floor level and continuing to the top of the frame.
Your supplies will determine how the roof is fixed. It would be possible to screw on a plywood roof. Water-based fence and shed stain will be used to paint the smoker's outside. There won't be any interior painting.
Materials Needed
- The ProQ smoke generator
- Four magnetic clips
- Ten 1.8m lengths of tongue-and-groove cladding board
- Four 2.5cm square 1.8m lengths of timber
- A few bags of wood dust
- Set of 3 non-stick cooling racks
Tools Needed
- Wood saw,
- Water-based shed stain
- screw driver
- Electric drill
- Screwdriver
- Variety of screws, pins, fencing staples
- tape measure
- A roof slate
- Wood glue
7. How To Build A Cold Smoker
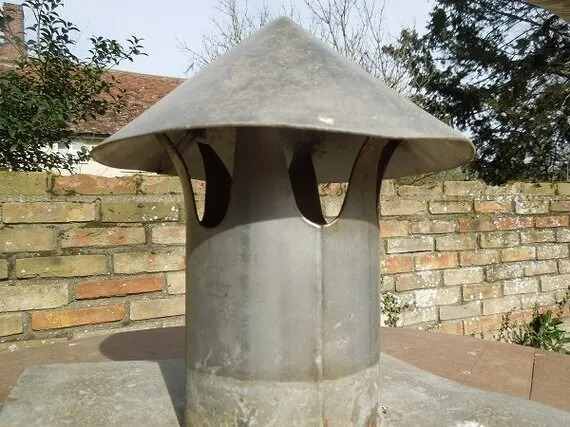
The creators intended to reuse an old, leaky rainwater barrel, so they pieced the remainder together using scraps they found while scrounging and scavenging. They merely purchased a low-cost metal trash can, a chimney collar, and some jubilee clamps. Without including the initial barrel cost, the entire thing came to roughly £40.
According to conventional wisdom, if you're making one at home, you'll need a smoke chamber, a smoke generator, and a pipe that transports the smoke between the two while cooling it. Naturally, cold smoking differs from hot smoking in that it doesn't really cook the fruit; alternatively, it merely imparts flavor.
It helps to be a somewhat skilled handyman or handywoman because this was constructed using the old-fashioned method. The rainwater barrel's top was cut off and modified to make a detachable cover with a smoke vent.
The cooling pipe, which is a piece of chimney liner, needed a hole to be cut into the barrel's side at the bottom. The smoke generator, which is little more than a metal trash can with an incineration lid, is covered by the pipe's opposite end.
A wire mesh column, about 15 cm in diameter and 60 cm high, was within the bin to retain the sawdust. Once lit, it will gladly continue to burn for eight to nine hours without any further assistance from us. It's best to avoid using firelighters to ignite the sawdust since, according to what I've heard, you can never get rid of the flavor. The ideal poker is electric.
Materials Required
- Wire mesh
- Pipe
- Pile of sawdust
- Top of a rainwater barrel
- Steel chimney top
- Wooden brackets
- Rods
Tools Required
- Electric poker
- Drill
8. How to Turn an Old Fridge Into a Cold Smoker
| Level | Medium |
| Material | Old Fridge, Wood |
| Cost | $50-$200 |
Have you ever pondered what to do with an old refrigerator that has been gathering dust while you wait to dispose of it? You might want to pause and consider whether you could perhaps turn that old appliance into a smoke cabinet before you decide to get rid of it.
The first step is cleaning the fridge, especially if it is an old one, to get rid of grime or debris. When the fridge looks all cleaned up, you’re ready for the next step.
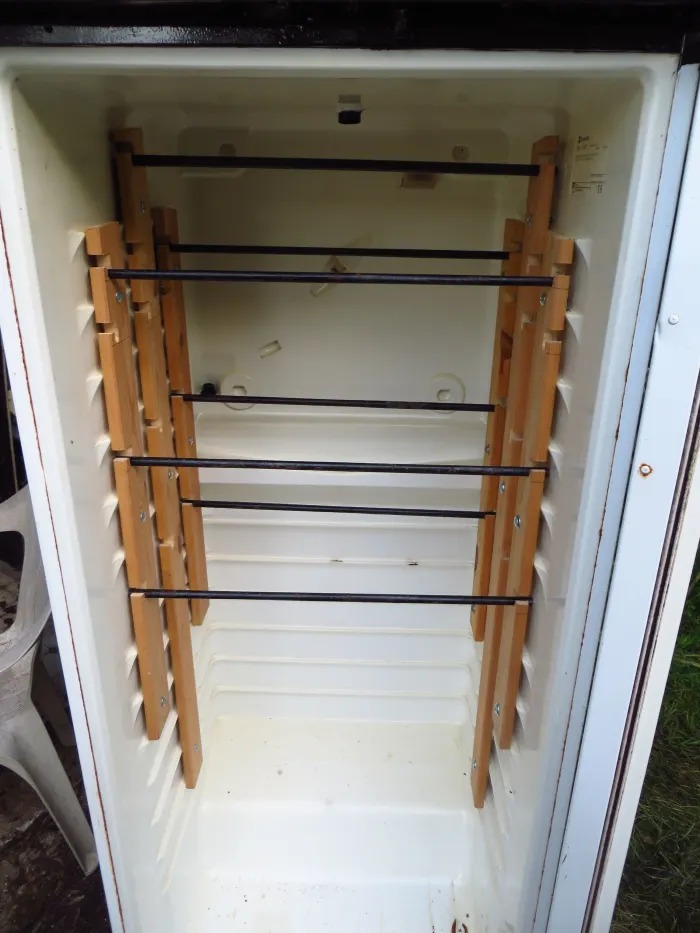
Decide Where You Want Your Shelves. Take a look at the internal measurements of your refrigerator and consider where you want your shelves. It's time to start working on the slats when you've selected how many shelves and how much holding space you want.
Draw horizontal lines (using a steel rule or set square) where you would like the base of each notch to be starting with the center slat, as it will be the longest of the three. In this method, level racks are guaranteed.
Cut the metal rods to a length that is 10 to 15 millimeters or less than the internal width of your refrigerator using a hacksaw. Build the chimney Create a Chimney Aligning Hole, then Fit the Chimney. Using a sealant gun, apply sealant to any holes or gaps. After that, fireproof the refrigerator's bottom section. Thermometer installation, final cleaning, and smoke testing complete the setup of your cold smoker.
Materials Needed
- Old fridge
- Wooden slats
- Iron/steel rods
- Steel sheet
- Wine corks
- Silicone sealant
- Bolts — 6 mm
- Nuts and washers
- 1–2 feet of steel pipe — 30 mm diameter (~1.5 inch)
Tools Needed
- Drill
- Measuring tape
- File
- Tin Snips
- Coping Saw
- Hack Saw
- Sealant Gun
- Bench Vice
- 15 mm circular cutter
- Drill Bit for wood
- Pencil
- Steel Rule
- Hammer
9. DIY File Cabinet Smoker
| Level | Easy |
| Material | Filing Cabinet |
| Cost | $50-$100 |
This project is as simple as it gets in comparison to making an offset smoker out of an old gas tank. All you require is a drill, an old metal file cabinet, and some free time.
The epoxy paint used to prevent rust on painted filing cabinets releases toxins when heated, therefore you'll need to purchase yourself an unpainted file cabinet. Once you have your filing cabinet—which you can purchase either brand-new for about $110 or used for about $60—you'll need to paint it with heat-resistant BBQ paint.
Drill air holes through to the bottom of the draws and the cabinet's top when you've finished. Then attach two temperature gauges to the sides of your new smoker, one near the top and one near the middle.
You may use normal BBQ racks to store your food in the other draws, and the bottom draw will serve as your firebox. This project should take at most 30 minutes to build.
Materials Needed
- Heat resistant paint
- BBQ racks
- Two temperature gauges
- An unpainted filing cabinet
Tools Needed
- Drill
10. DIY Hot And Cold Smoker
| Level | Hard |
| Material | Metal |
| Cost | $300-$700 |
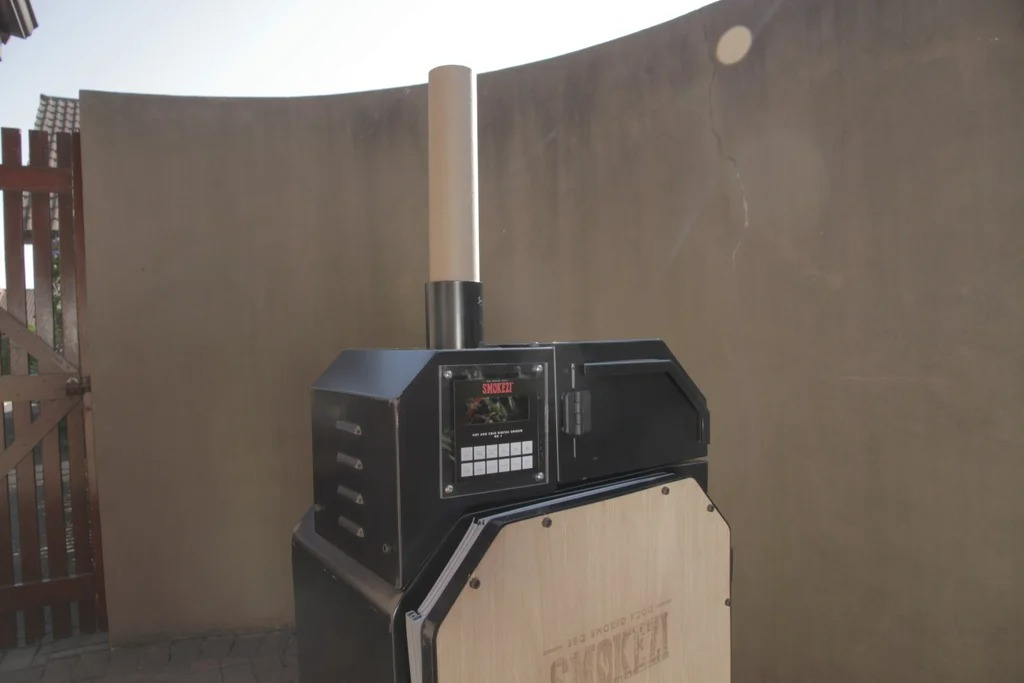
With the use of this device, you are able to smoke food at a controlled temperature with consistent smoke without experiencing any of the harmful side effects that come with using a regular conventional food smoker. This device uses electricity to smoke hot and cold food. Smoke from a cold smoker isn't really chilly; it's more like room temperature.
A "Smokezi DWG & DXf" zip file including the entire layout of the Smoker cabinet is included in the full lesson as an attachment. To a CNC cutting machine and bender, send the file. Each drawing includes information about the grade, thickness, and type of wood and metal used.
You can begin putting and welding your metal piece together once it is finished and prepared for collecting. Send all of your mild steel to your local paint shop for powder coating once your metalwork has been entirely assembled.
Connect the inner chamber and exterior casing, then spread fire blanketing across the space between the two. This serves as insulation against the extraordinarily high temperatures that the inner chamber will discharge.
Installation of the smoke box and brain assembly follows. The installation of the oven element, the main power supply, and ultimately the door may be a little challenging but not impossible.
Materials Needed
- 1x FMC heaters 111L X 65W 230V 200W
- Main power supply 1x Standard female plug with a 10amp
- 1x off Tubular heater 8D X 775L 230V 500w
- 1x off Limit thermostat 40 - 210 degrees Celsius
- 2x on/off switches
- 20 meters of heat proof cable
- 1x AC computer fan
- Synchronous motor 49TYJ 220 -240v 50/60hz 2.5/3 rpm <= 4w CV
- 1x reset switch
- fuse and a built in On/off switch
- 4x door hinges
- Assorted countersunk nuts and bolts
- 2 meters of standard 700’c fire blanketing
- 2x micro switches and a standard timing switch.
Tools Needed
- CNC Laser
- Drill
- Wrench
11. Turn Old Fridge Into Cold Smoker
| Level | Easy |
| Material | Old Fridge |
| Cost | $10-$60 |
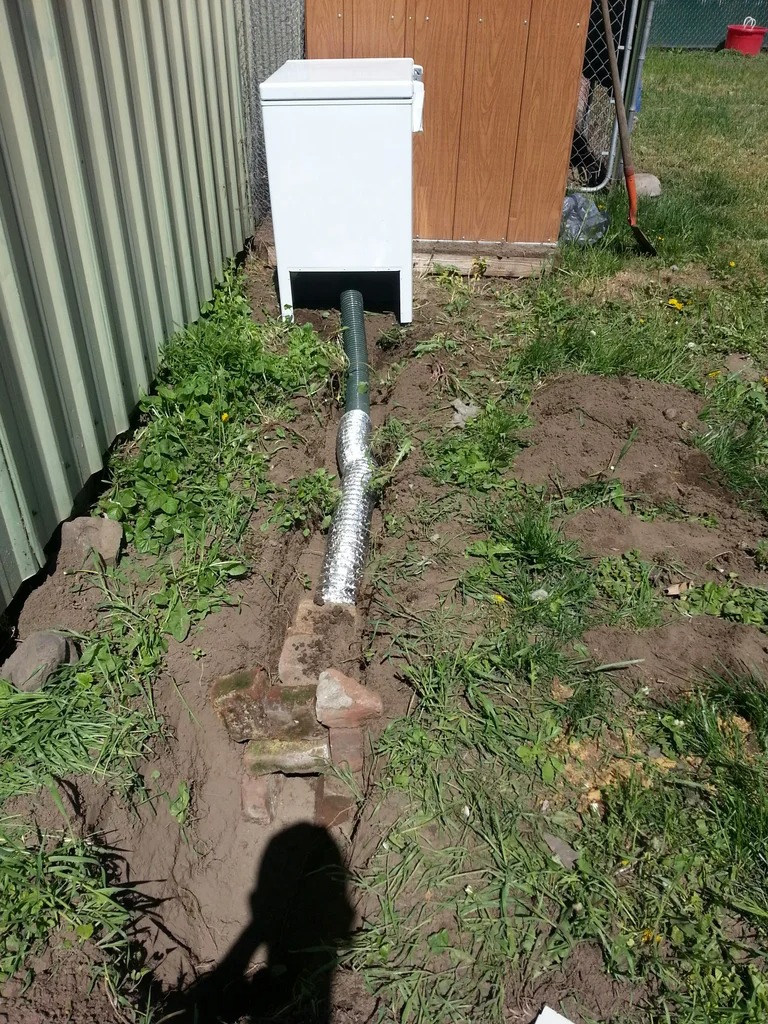
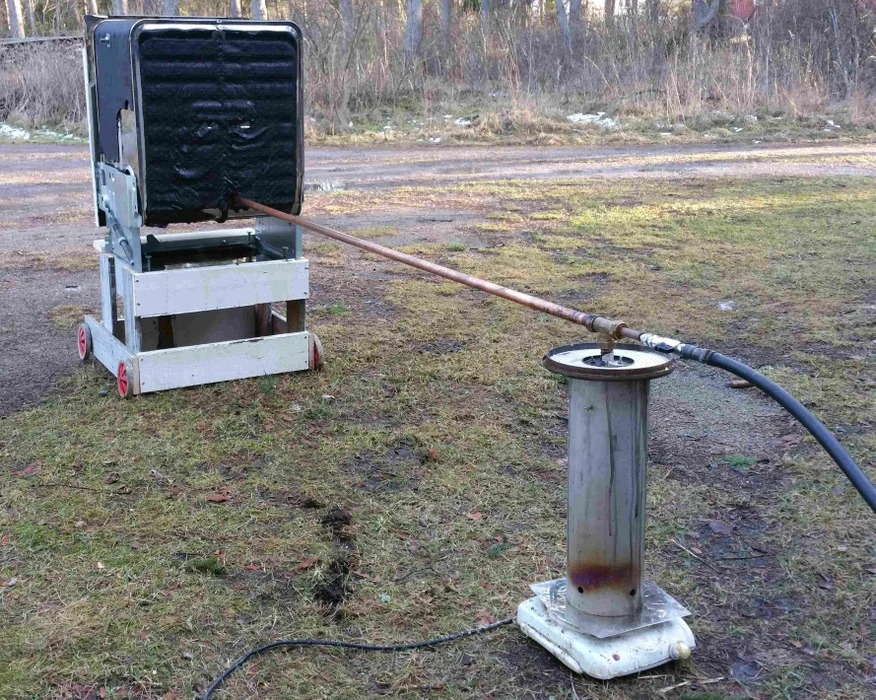
Here’s a tutorial that will teach you how to turn an old freezer that you probably abandoned into a cold smoker. To prepare the appliance (the fridge), you must first remove all accessories, including the thermostat and compressor.
Determine the location. Use a ¾ inch hole saw to establish a location for the saw where you intend to insert the ducting into the device. Trim around the out line with the saw and attach the ducting.
Install the unit and attach the ducting. Create a masonry tunnel at the start of the tunnel and insert ducting into it. Install a baffle over the smoke hole in the unit. Backfill the trench, cover the smoke box with a lid, and you're done.
Build a great coal bed by making a fire inside the smoke box. Place the lid on the coal bed and a full bag of your preferred soaking chips. Sit back and observe as the smoke begins to roll.
Materials Needed
- A Old Freezer
- Bricks
- Item To Use As A Smoke Baffle
- Lid To Cover Your Smoke Box
Tools Needed
- Reciprocating Saw
- Dryer vent ducting
- Screwdriver
- Shovel
12. DIY IKEA Cold Smoker
| Level | Easy |
| Material | Wall Cabinet |
| Cost | $100-$250 |
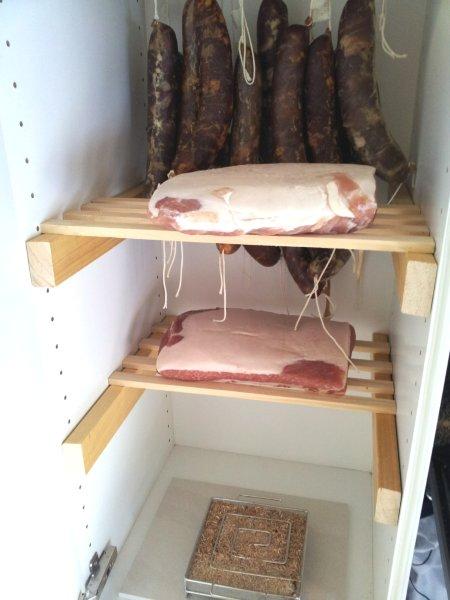
For this build of an IKEA cold smoker, you must go to the store and buy all the parts separately because it is less expensive! Shelves - Cut down any soft or wooden strips to 36 cm x 15 mm square (or 20 mm sq). Must be 36 cm precisely. Additionally, ensure they are free of any rough edges, varnish, or other treatments.
You'll need to trim down any soft or wooden strips to 36 cm x 15 mm square shelves (or 20 mm sq). Must be 36 cm precisely. Additionally, ensure they are free of any rough edges, varnish, or other treatments.
Side supports: 34.1 cm, 40–50 mm deep, and 30 mm thick. Drill to size after measuring against the metal peg holes. For a better cantilever feel, drill holes should be placed closer to the top of the support.
Make sure the back is securely fastened before assembling the cabinet. Cut supports and shelves. Twenty shelves and three side supports were created by me, but you can make as many as you like. Continue using the pre-drilled holes. Duck tape should be used to seal the door's back, leaving one hole exposed.
The double door seal should be cut apart to create a single seal. Stick slowly around the door, slicing the final piece to size to guarantee a tight fit. Add the door after mounting the door hinges. To compress the door seal, use one more strip of duct tape to close the door tightly. After that, add a ceramic tile and the £34.9 Pro Q Smoke generator. You'll also need some smokeable dust.
Materials Needed
- Wall cabinet 92cm x 40cm x 35.5cm 18mm melamine
- Door Applad
- Hinge Pack
- Dust
- Shelf Support Pins
- Stormguard EPDM Rubber P-Profile – White – 10m
- Shelves– Any soft or hardwood strips cut down to 36cm x 15mm sq
- Side Supports – 30mm thickness x 40-50mm deep x 34.1cm.
Tools Needed
- Drill
- Duct Tape
13. DIY Cold Smoking In An Igloo
| Level | Easy |
| Material | Wood, Igloo |
| Cost | $20-$60 |
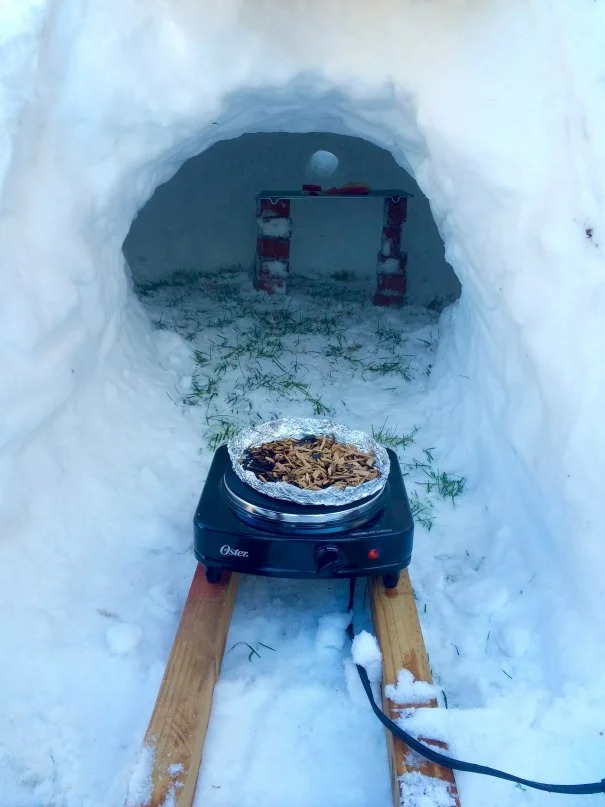
Start by piling up enough freshly fallen snow to build an igloo that is four to five feet high. If your snow is powdered, you will have to compact it as you go if you want it to stay in place and not collapse on your lovely food.
If the snow is moist, it will probably perform a good job of self-compacting. You can begin carving out the interior space once you have a sturdy mound of compacted snow that is four to five feet high. Chuck removes each small load of snow with a plastic sled and a shovel.
To drag the smoke through, you must now add your oculus. Drill a 3 to 4 inch opening from the exterior of the dome, across from the entryway, using the handle of a shovel. It should be directed downward toward the interior of your igloo and be located around three feet above the ground.
Set up two even stacks of bricks within the igloo to accommodate your oven rack, which should extend about two thirds of the way up inside the structure. Then place your cured fish on the rack.
Put sufficient wood chips inside the pie pan to close the bottom outside the igloo. Turn the electric hot plate to medium and place the chip pan on it. Watch for smoke to appear, then wait for the temperature to be exactly right for a slow, constant stream of smoke.
Materials Needed
- Bricks
- Oven or cake cooling rack
- A piece of plywood
- Extension cord
- Prepared wood chips made for smoking
- Disposable aluminum pie pan
- Wood
- Electric hot plate
Tools Needed
- Shovel
14. UDS Cold Smoker Electric Heating With PID Control
| Level | Medium |
| Material | Drum |
| Cost | $100-$200 |
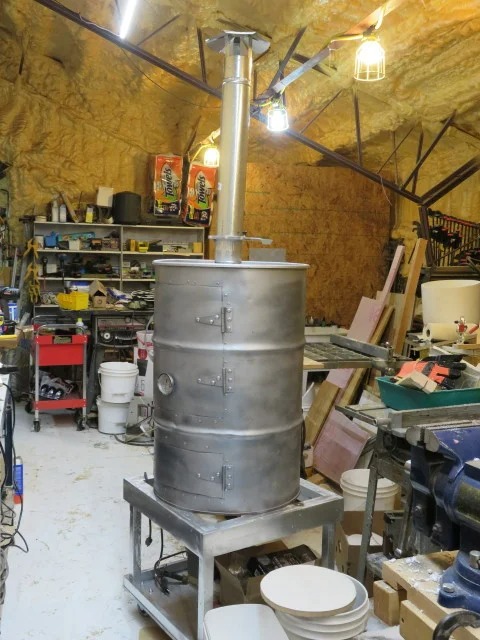
Here’s yet another Cold Smoker you can DIY using a tank. Basically, this was built from scratch by purchasing some basic materials and putting them together to create this unique cold smoker. It has an ideal heating element and heating control, both of which were installed differently.
A propane weed burner was used to burn the paint off the drum outside. Alternatively, a wood fire could be built and the drum could be placed on it to do the same thing. Remove the ash using a wire brush once the drum has cooled.
The roof of the smoker needs a damper and chimney. The creator got a wastegate from a woodwork dust collection system rather than create a damper (metal not plastic). All that was required was to saw a hole in the middle of the lid and attach a pipe flange because it was designed for a 5 inch pipe.
To fill the kerf (saw-cut space) surrounding the doors, a door seal was required. For a catch pan or water pan, one rack was positioned below the door. The other racks were spaced apart for general use.
More racks can be purchased if you start producing a lot of little goods. Two racks can be piled on top of each other to hang goods like sausages, and the sausages can then be suspended from the strings by the racks.
The drum's exterior was sprayed with heat-resistant paint similar to that used on exhaust manifolds for automobiles.
Materials Needed
- Drum
- BBQ unit Electric Heating Unit
- 3- 36 inch long adjustable shelf bracket supports and clips
- 22 inch racks
- Galvanized steel flashing
- 5 inch pipe
- Propane Weed Burner
- Hinges
- Magnets
- Wood
- complete kit PID control
- 40 amp relay and k type thermocouple
Tools Needed
- Drill
- Cutter
- Masking Tape
- Saw
15. DIY Wood Smokehouse
| Level | Medium |
| Material | Wood |
| Cost | $80-$150 |
If you want to create something more long-lasting to smoke food, this project enables you to do so without spending a fortune.
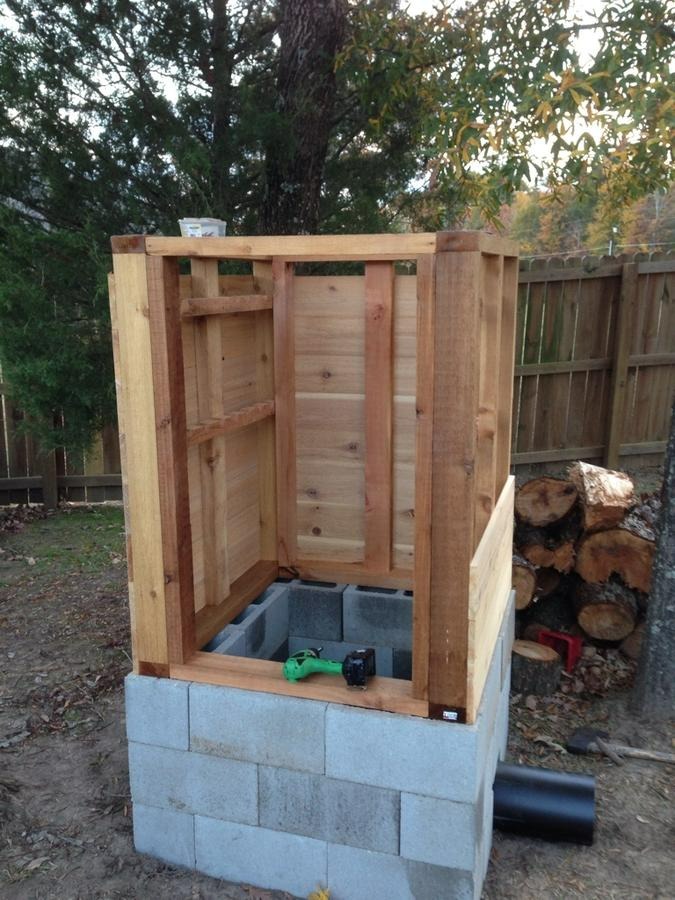
Basically, this project's design consists of a cinder block base with something like a wooden smoking cupboard on top. A minimal heat brick-lined fireplace that is independent of the smoking cabinet is where the smoke emanates from.
The advantage of constructing this specific smokehouse is that it is fast and simple to construct and, once finished, provides a substantial quantity of area for smoking.
This smoking area is perfect for smoking whole animals, enormous sausage links, substantial pieces of pork or beef, and your own home-cured meats.
Materials Needed
- Electric Hot Plate
- Grating
- Wood Chip Box
- Temperature Gauge
- Trash Can with lid
Tools Needed
- Doorknob
- Door hinges
- 2-½ inch deck screws
- 2 x 4 cedarwood
- Bolt lock
- Clay bricks
- Metal mesh
- Three pieces 16 gauge steel plates
- Fire bricks
- Concrete blocks
- Fire clay mortar
- Stove door
- Black stove pipe
- Wood screws
- Bolts
16. DIY Flower Pot Smoker
| Level | Easy |
| Material | Flower Pot |
| Cost | $50-$100 |
Don't freak out if you suddenly have a hankering for smoked meat but don't have a smoker. Making one out of a pair of clay flower pots only requires a short trip to your neighborhood garden center.
Drilling ventilation holes into your clay planters is the first thing you'll need to accomplish. Begin with a thinner drill bit and increase it to the correct size to accomplish this without breaking your pot. Wine corks can be trimmed to fit in the air openings of your pot to regulate the airflow.
The charcoal will be held within one of your clay pots. Put a tiny BBQ grate on top of the brick in the bottom of the pot to contain the coals.
The pot on top of your head will contain the smoke. Due to the fact that both pots will become fairly hot, it is recommended to attach a handle to the top pot using the straightforward approach of drilling holes in the bottom then attaching a normal U-bolt.
You can move forward after the drilling & cork shaving are finished. The world won't end if you do not have any roll of BBQ gasket tape, which you can use to improve the seal between the pots.
After starting the fire, add the soaked wood chips to the grate at the bottom of the kettle. On a simple circular BBQ grill grate, arrange your meal above it. Seal the food by placing the top pot on top.
Materials Needed
- BBQ gasket
- Two clay flower planters
- Wine corks
- Circular grill grate
- U-Bolt (with nuts & washers)
- Small BBQ charcoal grate
Tools Needed
- Drill
17. Built-In Cold Smoker for Electric Smoker
| Level | Medium |
| Material | Blocks, Electric Smoker |
| Cost | $100-$200 |
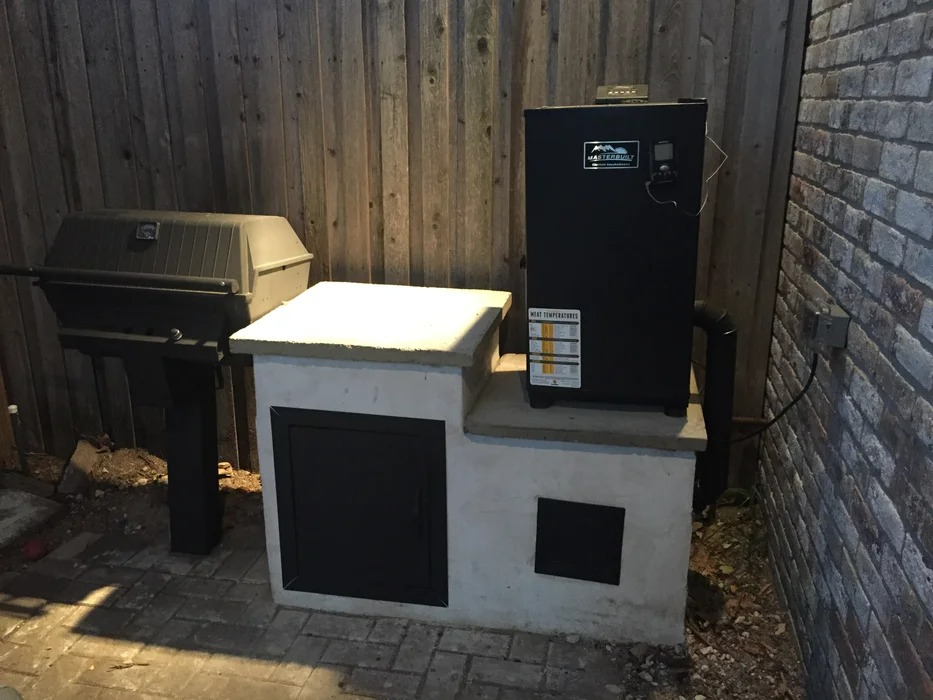
This instructable provides a framework for making a cold-smoker box out of concrete blocks that is designed exclusively for Masterbuilt electric smokers. It draws influence from the "mailbox mod" and aims to be more durable, aesthetically pleasing, and useful.
You must flip the center front brick on its side for the very first course or level. This will serve as the cold smoker box's interior base. Four 8x8x6 concrete bricks and one 8x8x8 concrete block are needed for this level. Naturally, you'll need mortar when doing the final structure.
Two 8x8x16 bricks and three 8x8x8 half blocks are needed for the second level. One of the blocks is upside-down. This has major significance.
With this configuration and the amps smoker, you should receive about 12 hours of thin blue smoke. The meat cooks well, and you won't need to keep replenishing the chips.
Materials Needed
- grill cart door
- angle iron
- (4) 8x8x6 concrete blocks
- (1) 8x8x8 block
- (2) 8x8x16 blocks
- (3) 8x8x8 half blocks
- 3" pvc sewer drain pipe
- (4) 4x8x16 *solid* concrete blocks
- (2) 8x8x16 blocks
- (1) 8x8x8 half block
- 3" flex ducting
- a scrap piece of styrofoam
- 8"X 8" B-series Access Panel with touch latch for walls and ceilings
Tools Needed
- Drill
- Duct Tape
Cold Smokers Plans With Gas Tank
Gas tanks are no longer just used for holding and heating up your car's fumes. They're rustic, and they're actually quite versatile when it comes to building. If you have a gas tank don't worry, we'll show you some great DIY plans for cold smokers.
Here are some cold smoker plans made utilizing a gas Tank.
18. DIY Cold Smoker With Propane Tank
| Level | Medium |
| Material | Propane Tank |
| Cost | $80-$150 |
This is a great illustration of how you can DIY a larger version of the perennially famous Weber Smokey Mountain smoker out of something that would typically be thrown, like a 100-pound empty propane tank.
The first step you must do is inject a small amount of water through the valve to your gas tank. It only has to be a small amount of water to sit within the canister in which you are drilling or cutting and stop any remaining propane from igniting.
Drill a hole at the tank's bottom, then pour freshwater through the valve to completely fill the tank, displacing any remaining propane. Simply let the water run out after it is completely full.
Cut off the tank's top, which has the valve on it, using an angle grinder. The two doors for the meat shelves and the firebox must next be drawn out. Simply solder hinges onto the portions you cut out, then reattach them to serve as your doors.
If you can find any that fit, the grates can be made of expanding metal mesh or they can be regular circular BBQ grates. After that, all that is left to do is to make a cut for a temperature gauge.
Material Needed
- Expanded metal mesh
- Hinges
- Expired propane tank
- Temperature gauge
- Steel pipe
- Heat resistant handles
Tools Needed
- Drill
- Angle Grinder
- Spot Grinder
19. How To Make a Cold Smoker
| Level | Medium |
| Material | Propane Tank, Smoking Chamber |
| Cost | $100-$200 |
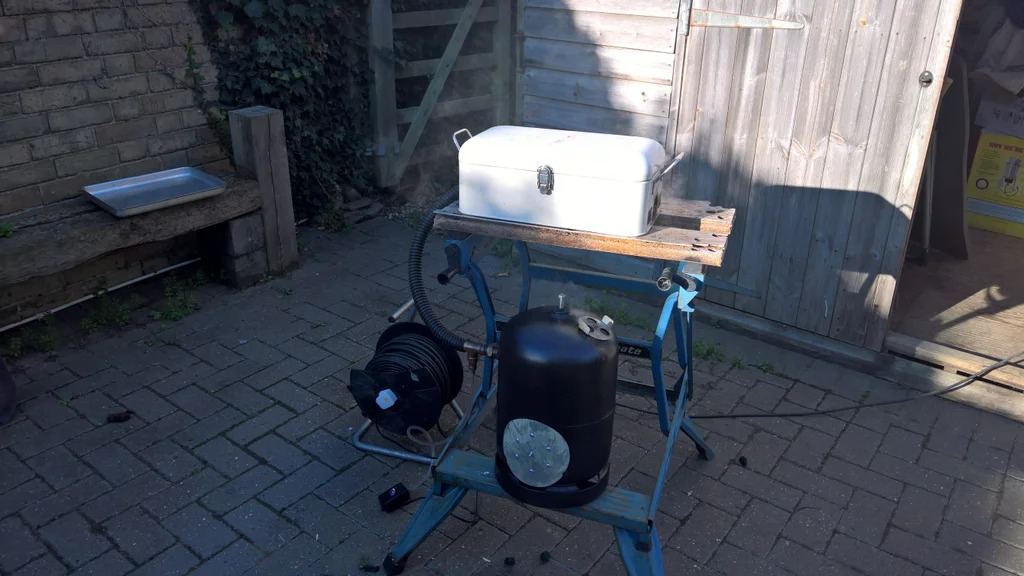
This is a basic guide on how to make a vent for the smoke generator. It aims to use a few standard components, so you'll need a gas canister or anything else that requires a vent.
There are three parts to this tutorial. The first instructs you on how to construct the vent, the second on how to construct the door, and the third on how to construct a pump. Cutting out the Vent and bending it into shape is the first stage in creating the vent.
Simply sketch the pattern directly on the metal with a sharpened scribe because aluminum is a rather soft metal. To draw the circle, use the dividers on the compass as a guide. To cut through the aluminum against anything flat, clamp it to some wood or chipboard.
You simply need to drill a 3mm hole in the center at this point. It seems simpler to bend the larger component if you clamp the lug portion in a vice. By doing this right away, the shape gains a little rigidity and becomes simpler to handle.
After building the vent and door, the pump comes last. The complete guide shows you how to assemble all the materials together with the help of the tools.
Materials Needed
- 500mm x upc pipe 7mm
- A gas canister
- upc pipe
- A smoking chamber
- 1 x 50mm x copper pipe 22mm
- 1 x Copper solder ring equal Tee 22mm;
- 1m x flexible pipe 25mm
- 1 x Copper solder ring straight coupling 22mm
- 1 x Copper tank coupler 22mm
- 1 x Copper solder ring reducer 15mm to 22mm
- 1 x wine cork
- 1 x aquarium pump
- 50mm x Copper pipe 5mm
Tools Needed
- 1 x drill (potentially electric)
- 1 x Solder
- 1 x 30mm diameter hole saw
- 1 x Solder Torch
- 1 x 7mm drill bit.
20. DIY Cold Smoker
| Level | Medium |
| Material | Stainless steel cylinder |
| Cost | $50-$150 |
Here is a breakdown of how to make a cold smoker that is both affordable and efficient. You can smoke fish or meat for several days without stopping your work or sleep because it continues smoking for 10–12 hours every refill. Whenever you wake up or return from work, simply fill it full, turn it on, and leave it alone.
This type of cold smokers has frequently been described. Even some commercial smokers are available for purchase. By enclosing a narrow tube inside a thicker one, it is intended to produce air flow with the aid of a compressor.
Start with a stainless canister that is approximately 500 mm tall and has an interior diameter of 140 mm. It is roughly 2 mm thick. It is irrelevant what shape the chamber's cross section is. Any form will work.
Ensure that it has sufficient capacity if you desire it to smoke for a long time. When you are completed, use the screws that are attached on either side of the cylinder to secure the entire setup to prevent it from falling over and igniting the surrounding wood.
Setting up the piping is easy, Bore a hole and then add the piping and ensure there are no loose ends. Complete details can be found on the instructions page.
Materials Needed
- stainless steel cylinder 140mm
- Screws
- Steel plate
- Glowing wood
- short 22 mm copper tube
- 22 mm T-joint
- 12 mm copper tube
- 2000W plate with thermostat
- industry size compressor
Tools Needed
- Drill
- Wrench
Final Words
In this way, whether you have a need for smoking food for a hobby or for other reasons, the smoker plans should help you to get there. The instructions are easy to understand and follow, so take your time to decide which is the best cold smoker plan for your needs. There is no reason to spend money on expensive equipment if you can make them instead.

Ask Me Anything