
Do you want to install your first DIY shower or are you looking to fix a leaking shower pipe? Maybe you just want an upgrade from the old pipe since you are remodeling?
Well, whichever the case, you are probably wondering if you can do it yourself. Fear not! We’ve put together the ultimate guide on how to install shower pipes in a wall.
So, just before you install your shower wall panel, wall board or wall tile as we have rigorously explained in previous articles, you’ll need to learn how to install shower pipes the right way.
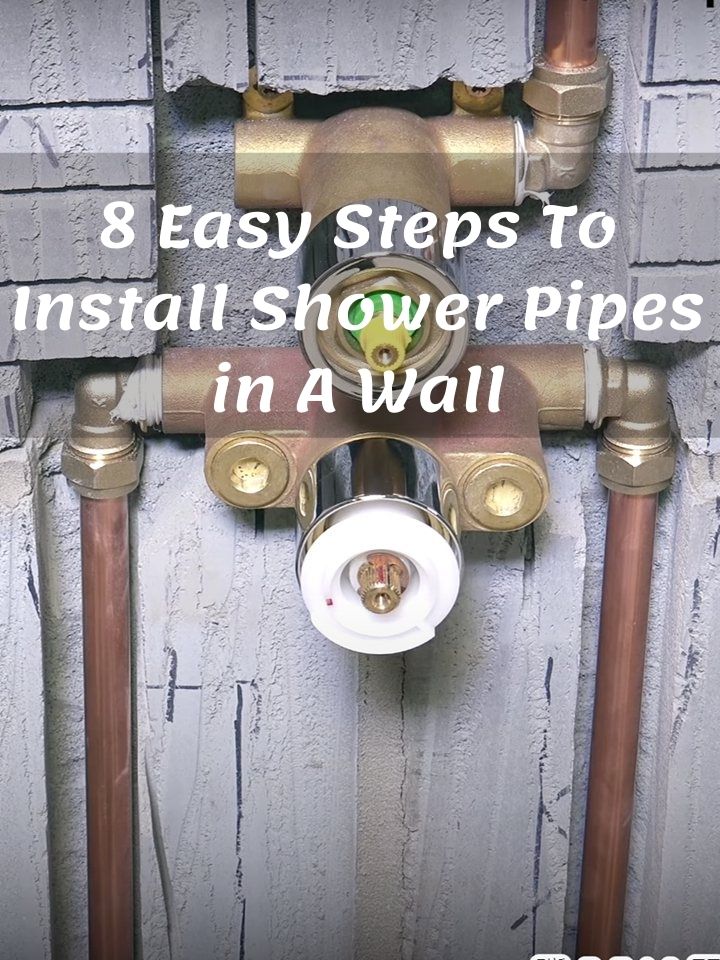
Table of Contents
A List of All You’ll Need
- Adjustable wrench
- Copper
- Drill
- Fittings
- Marker (a pencil would suffice)
- Measuring tape or ruler
- Nails (with threads)
- Pex pipes
- Pipe Cutter
- Plumbing Paste
- Plumbing Tape
- Protective gear – gloves, face mask, and goggles.
- Sandpaper
Steps To Install a Shower Pipe in The Wall
This step-by-step process will show you just how easy it is to install a shower pipe in the wall
Step 1: Safety First
Wear your protective gear to reduce the risk of getting hurt. This will include your goggles when drilling to prevent dust from getting into your eyes.
You’ll also need a gas mask to prevent you from inhaling dust particles which can end up causing respiratory problems. Wearing gloves when working is also a must, so you don’t burn your hands when handing fire.
Next, make sure your workspace is clear. To avoid hurting yourself by mistake, don’t lump materials together. Also, keep everything organized and work in measured steps.
Last and also very important in this stage is turning off the water supply at the valve. You don’t want water gushing out as you work. That’s a disaster waiting to happen!
Step 2: Take Measurements
The fitting process is not a random. To ensure every component fits properly and is properly installed, you need to ensure all measurements and dimensions are precise. If you don’t do that, you stand a high of setting up a faulty system from the get go.
This will mean you’ll spend more in the long run when it breaks down. Worst case scenario, the damaged part would affect other components, leading to a compound problem.
“So, what should I measure?” – tap height and width.
Tip: If you’re using a bath, ensure it is in position before you measure. Doing this would give you a precise measurement of the centerline.
The standard tap height is 1.3m from the floor but, you can adjust it based on your preference. Stand in the bath if you’re including one to measure. Draw a straight line and mark it off at your desired height.
Next up is the tap width. Still standing in front of the centerline, make a gesture of controlling your shower.
Then, place your measuring ruler or tape on the wall at that spot and measure 150mm – 75mm on each side. This gesture will help you figure a convenient location for your pipe outlet.
Draw a straight line down the middle of each 75mm width. This line is where you’ll install your hot and cold pipes. The center is where they meet for water to flow into the showerhead.
Step 3: Drill the Wall
This action will require you to put your back into it, depending on the type of wall you’re drilling. A brick wall is more challenging to cut through than a makeshift wood wall; whichever the case be careful not to pierce your main water flow valve.
Tip: As a rule of thumb, drill only 15mm deep.
If you install your shower during remodeling, chances are your wall is already broken. If so, you’re in luck; a chunk of your work is done already.
Step 4: Bury the Pipes
Cut your pipes with the exact measurements as the ones on your wall. A standard 22mm Pex pipe is okay. A ½ inch hole pipe is ideal for a tap; use ¾ inch for a larger volume of water flowing into a tub.
Fit each end of the pipes with a ring to hold it in place. Using plumbing tape to keep the tubes together is also a good alternative a ring is unavailable.
The, you can proceed to place the pipes into the holes in the wall.
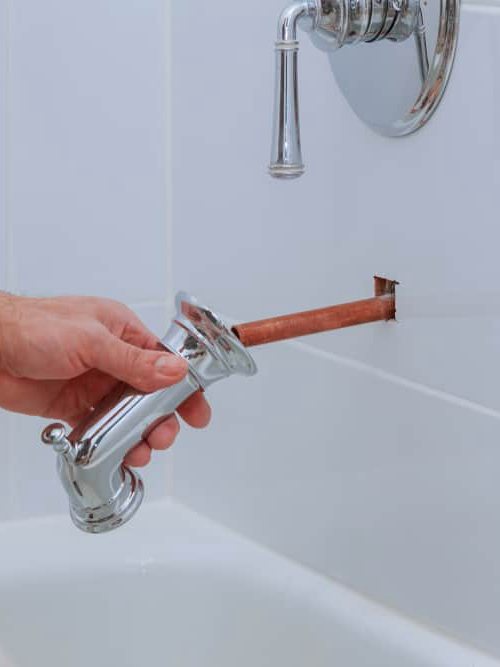
Ensure you shave down the copper before putting your pipe on it. “Why?” because it gives a seamless finish. Twist the pipe, then push it down till its firm.
Tighten the rings with your adjustable wrench.
In plumbing, we call the outer and inner parts of a tube fitting – outside and inside diameter.
Mask the outside diameter of the compression fitting’s thread with plumbing paste or tape. Some people use both for double protection.
Place the compression fitting on the center spot of the width then, screw it firmly against the wall. This is the point to separate the hot and cold inlets. Connect the isolation valves to the pipes.
Assign each tube on the sides to one. Leave an extra length of your elbow pipes out. You don’t know how much you’ll need after you close the wall.
In case you’re using a power shower, you need electrical wiring. Putting an overhead in the ceiling is another task.
Step 5: Cover up your wall
Your hot and cold pipes should meet at a combination boiler. This boiler has a single line on top feeding water to the shower at this point.
Use a plumbing paste to cover your pipes for a brick wall. You can use a moisture-resistant board for wooden wall. If your tap has a base, pass your copper heads through the holes.
Cut the excess at the marked spot, then fix a ring on it. Tighten with a wrench before you set your connector.
Attach the drop on the Pex pipe. Fit it on top of the water compressor, then drill it into the wall. The nails keep it from moving under pressure.
Step 6: Fixing your taps
At this point, your shower structure is ready to use. All that’s left is for you to screw on the showerhead and taps.
In fixing the faucet, make sure your valves fit with the washer for free flow. An ill-fitted tap would leak and wastewater.
You can buy a flexible showerhead or even a removable one. Washing is easier with this type because it moves; you’re not limited to a spot.
Handheld showerheads work well for children’s bathrooms and pet tubs. Screw on the bracket of the shower hose to the compressor instead of a showerhead. Connect the bottom of the hose to it.
Finally, attach the handheld showerhead to the top of the hose. Ensure all screw connection is tight to avoid leaks.
Step 7: Check your water flow
Turn on the water supply at the main valve. Open your taps and shower to test the water flow. Make sure there are no leaks from ill-fittings.
Leaking taps waste an average of 30 gallons of water daily. The implication is that you compound your problems. You have to spend more money on fixing a leak.
Make sure the fittings are airtight to prevent this situation.
Step 8: Clean up
Once you’re satisfied that everything is working fine, tidy up! Clean the mess you’ve made from working.
Wash your goggles and gloves. Arrange your tools in a box. You want easy access when next you need them.
Put your excess materials away in a secure place. Keep out of reach of children and pets. Good care guides against home accidents.
Sweep the area to get rid of dirt and dust. Mop the floor for a glistening finish. A clean room helps you appreciate your hard work.
Helpful Tips to Remember
Here are few tips you need to remember in your in-wall shower pipe installation journey;
Tip #1: Know your pipes
Not all materials can be used when installing in-wall shower pipes. When you go to the hardware store, ask for a Pex pipe.
The material used in the making of Pex pipe is both flexible and heat resistant. You can bend it into an elbow shape, and rest assured that it won’t melt in the heat. Its features make it ideal for hot water flow.
Measure the inches of the pipe holes too. Remember that ½ inch is standard and ¾ inch is for heavy flow.
Tip #2: Use your wrench Properly
Be careful when you tighten your ring fittings. Please don’t use too much force so you won’t snap it.
Modern rings have snap-proof outer layers, though. This doesn’t mean you should break it, but it’s there as a backup.
Suppose you snap your ring check for the extra layer before disposing of it. You may not need to.
Tip #3: Use the Appropriate Replacement Parts
If you damage any part of your shower plumbing set, you can buy a replacement at the store. Some showers come with complete installation kits. However, they are expensive.
The more sophisticated a material is, the more money you spend. Get suitable quality fittings, so you don’t have to replace any parts soon after installation.
Conclusion
Now that you know you can save cost and install your in-wall shower pipes yourself how do you feel? Great and unstoppable yeah?
Here are some things to remember;
- Install your pipes during renovations.
- Wear protective gear to avoid accidents.
- Use accurate measurement for optimal performance.
Remember, DIY is not for everybody. If, after reading this, you’re still skeptical, please call a licensed plumber. We are ready to answer any questions you might have in comment box below.
Ask Me Anything